My review of the Moonlander MK1 keyboard

The Moonlander MK1 from ZSA is an ergonomic, highly customizable split keyboard. I ordered one after I couldn't stand anymore the pains I had each evening after a long workday. But how and why did I end up buying this weird-looking keyboard?
In this blog post, I want to share my keyboard journey, my experiences with the Moonlander, how I am using it and what I plan next.
Wrist and hand pains
My hand and fingers started to hurt around 2-3 years ago. It wasn't that bad initially, so I didn't give a lot of attention to it. But at the beginning of this year, I woke up one day, sat down, and started typing on my Apple Magic Keyboard. After a couple of hours, my right pinky finger began to hurt excruciatingly. I couldn't move it in any direction. After waiting a couple of minutes, It began to recover, but the pain was there.
It wasn't fun anymore, and I had to do something immediately. I started researching, and eventually, every single article I've found about ergonomics wrote about something called "Ulnar Deviation":
Ulnar deviation occurs when your wrist is bent outward in the direction of your little finger. It is among the most common and potentially damaging keyboard postures and can lead to carpal tunnel syndrome and other repetitive severe strain injuries.
Here is a photo of me using the Apple Magic Keyboard, showing it in real usage:
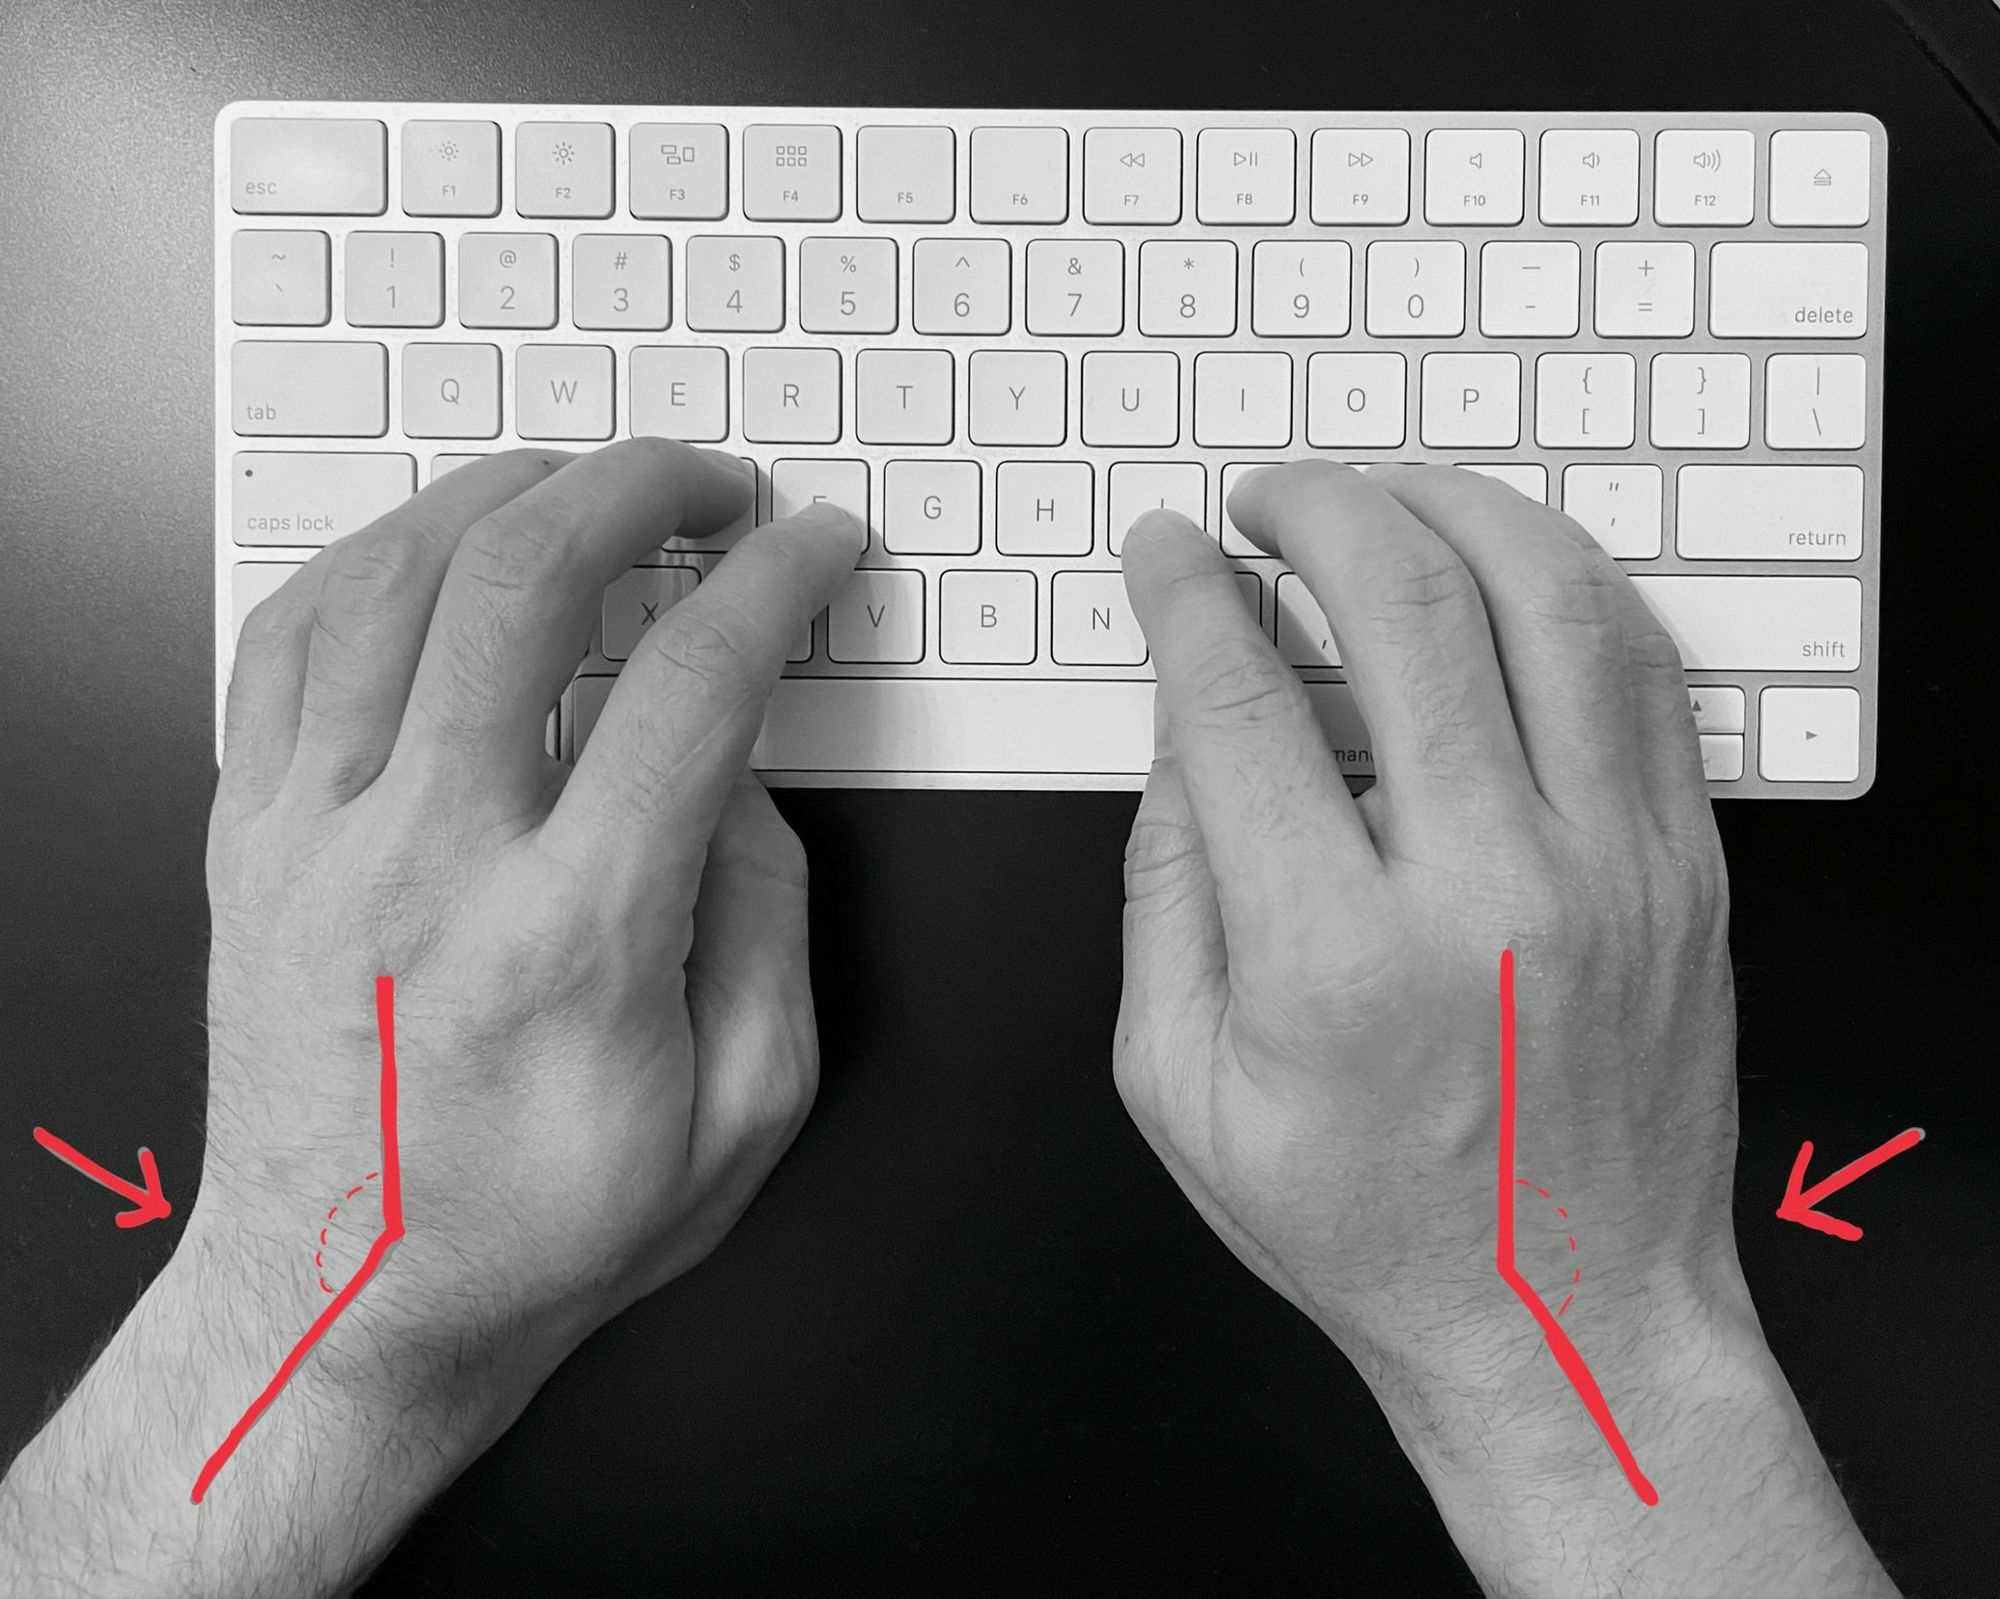
For years, I've typed in this position. As I said, it didn't bother me until this year when those painful days started to happen so often. After looking around, I've found a good-looking keyboard with tons of customizability options and was ergonomic from the start.
I've found the Moonlander MK1 and ordered it right away (well, not exactly like that because shipping to Turkey was disabled, but after a couple of emails with their excellent customer support, they enabled shipping to Turkey!)
The Moonlander MK1
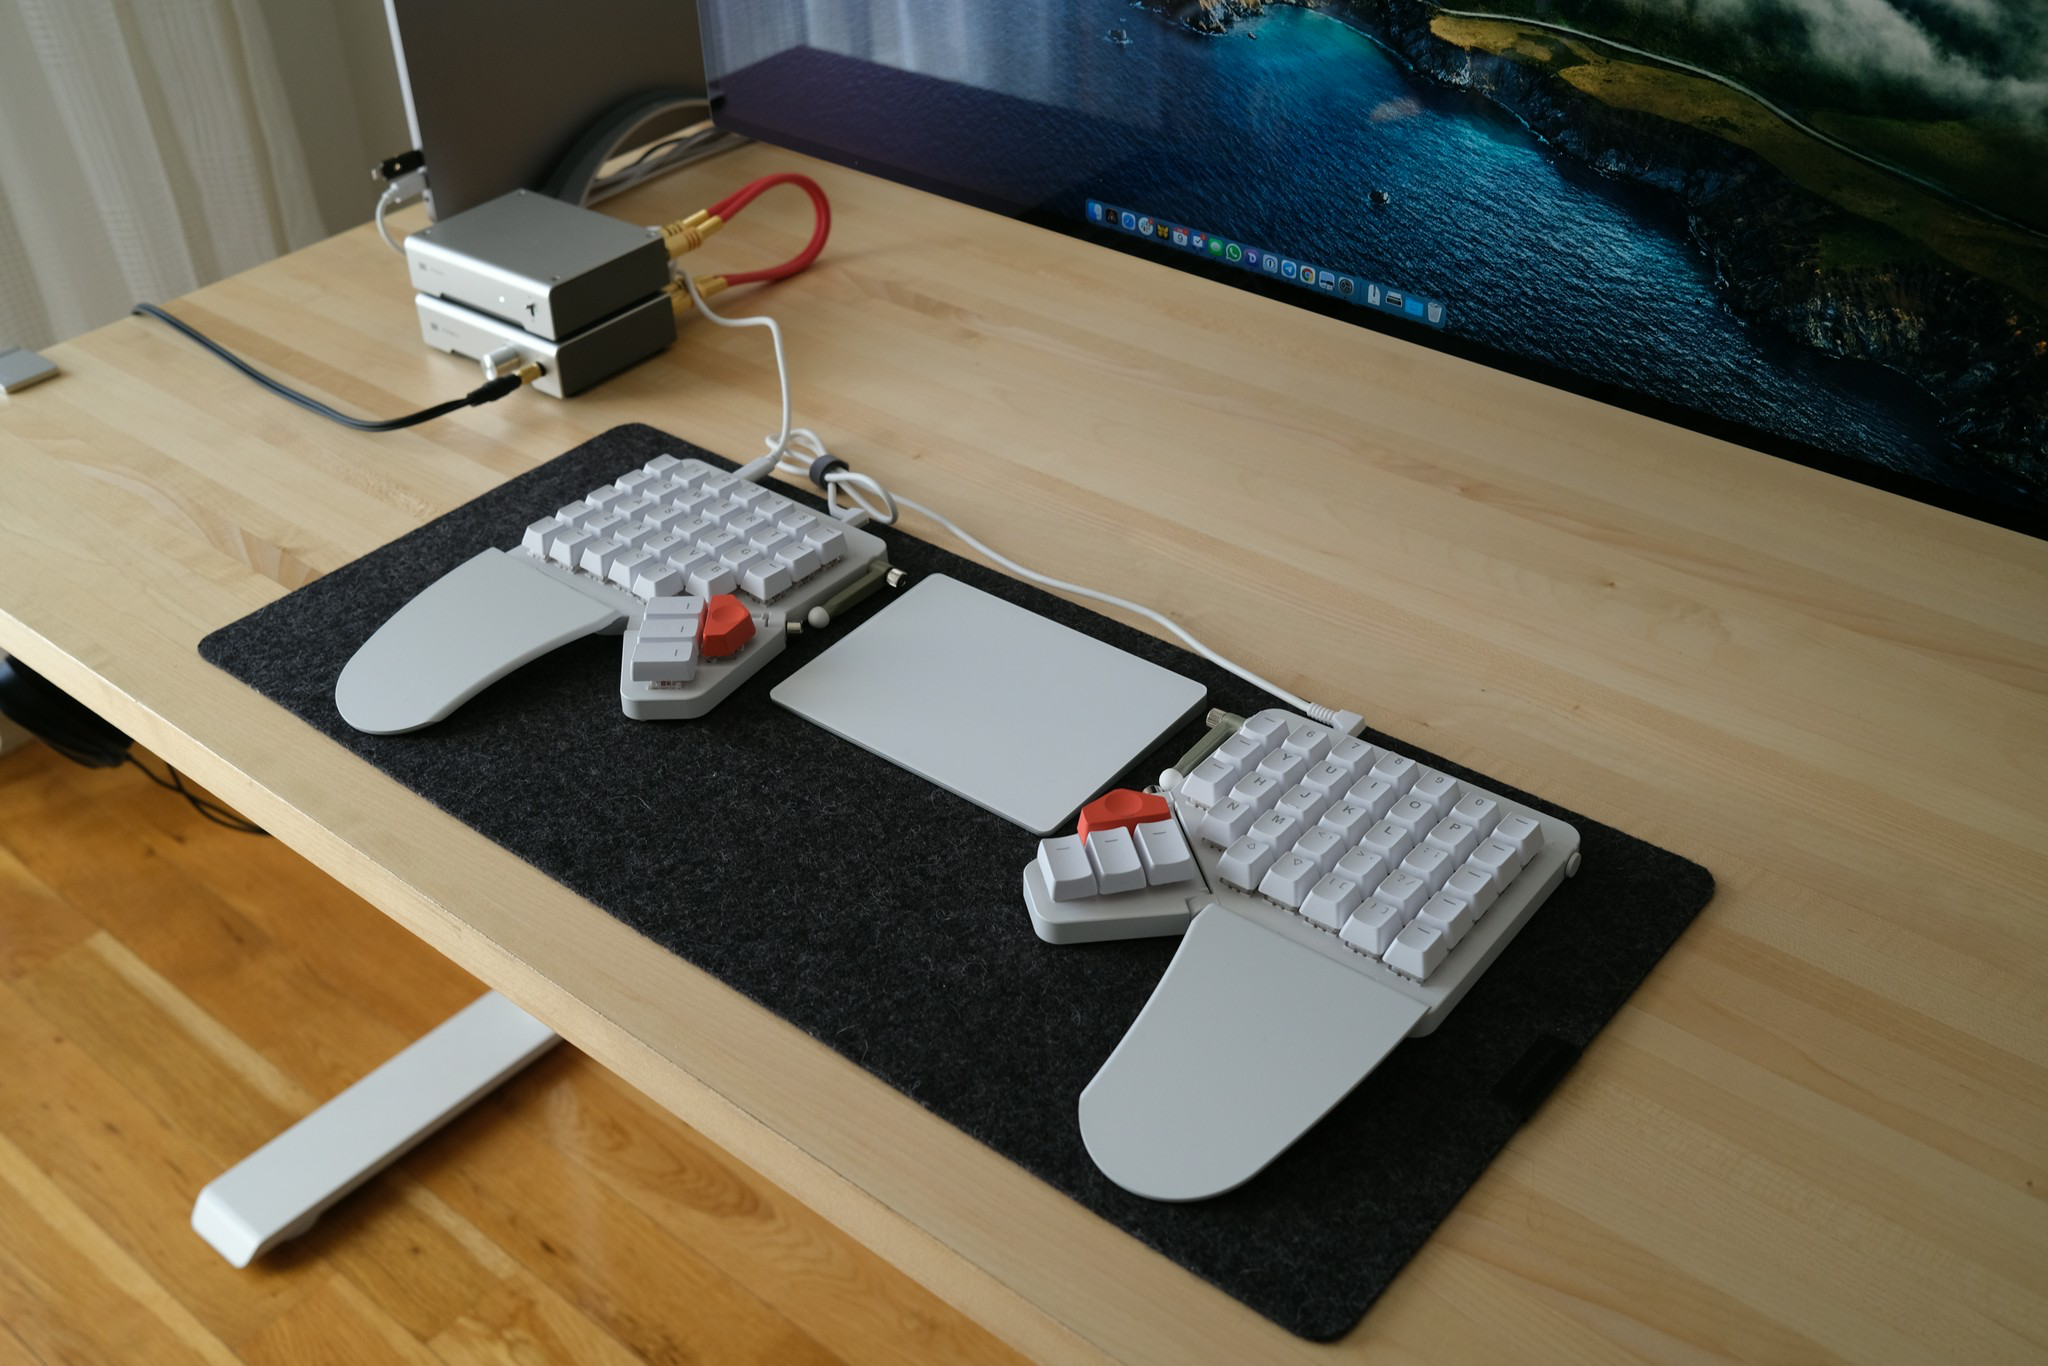
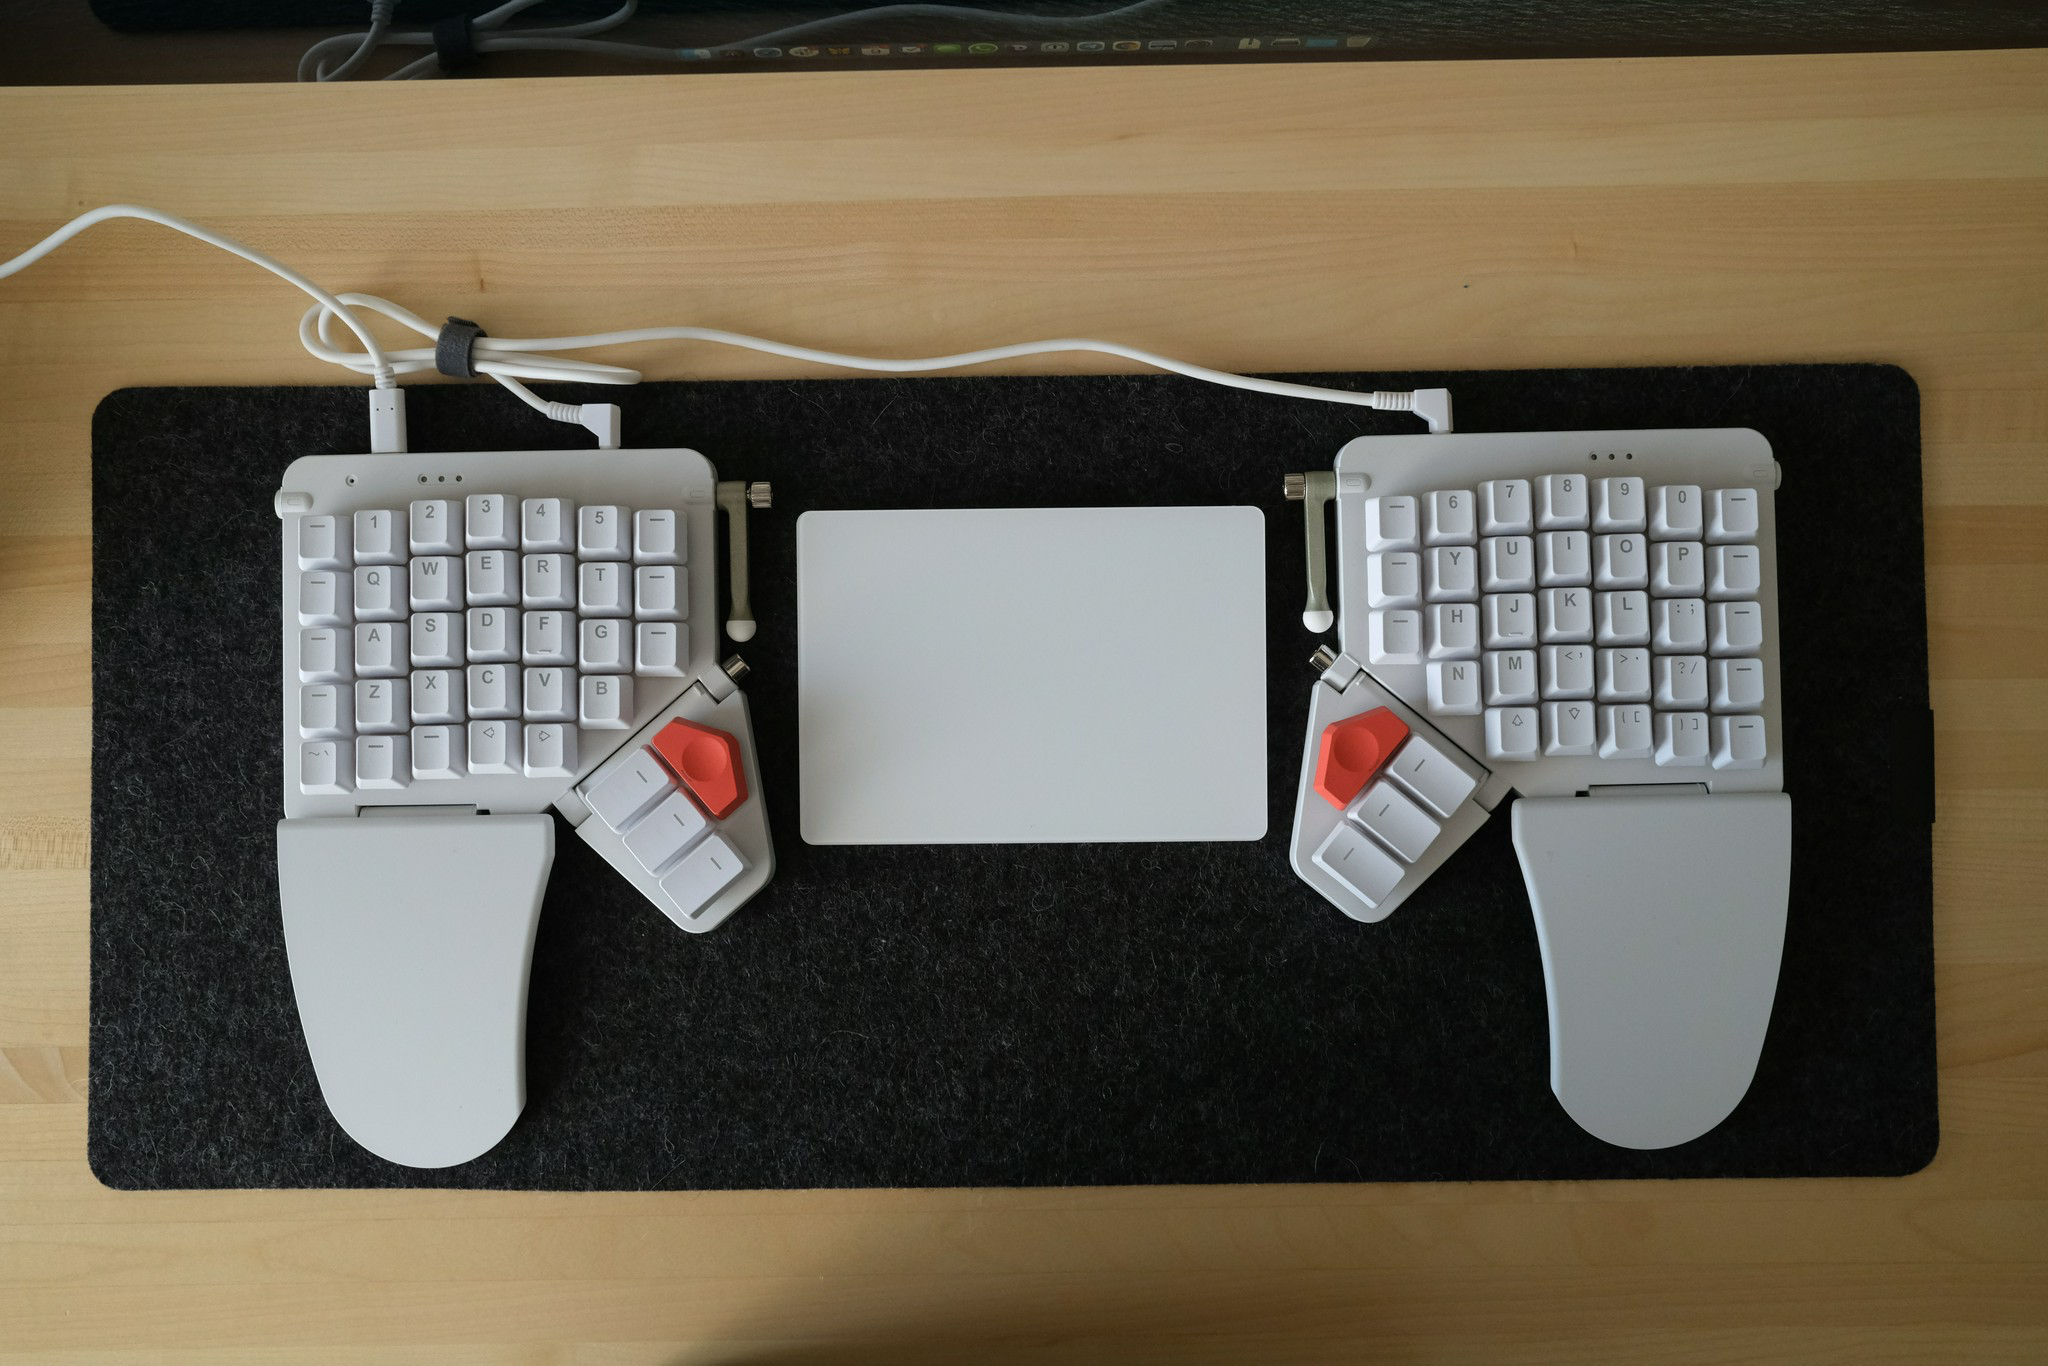
The Moonlander MK1 from ZSA is an ergonomic, highly customizable split keyboard. I feel it would be better not to go into a lot of details, for that, please visit their marketing website. But, there are a couple of things worth mentioning. As you see from the picture, it's separated into two halves and is attached by a TRRS cable. Being split is a game-changer because you can now type at shoulder width.
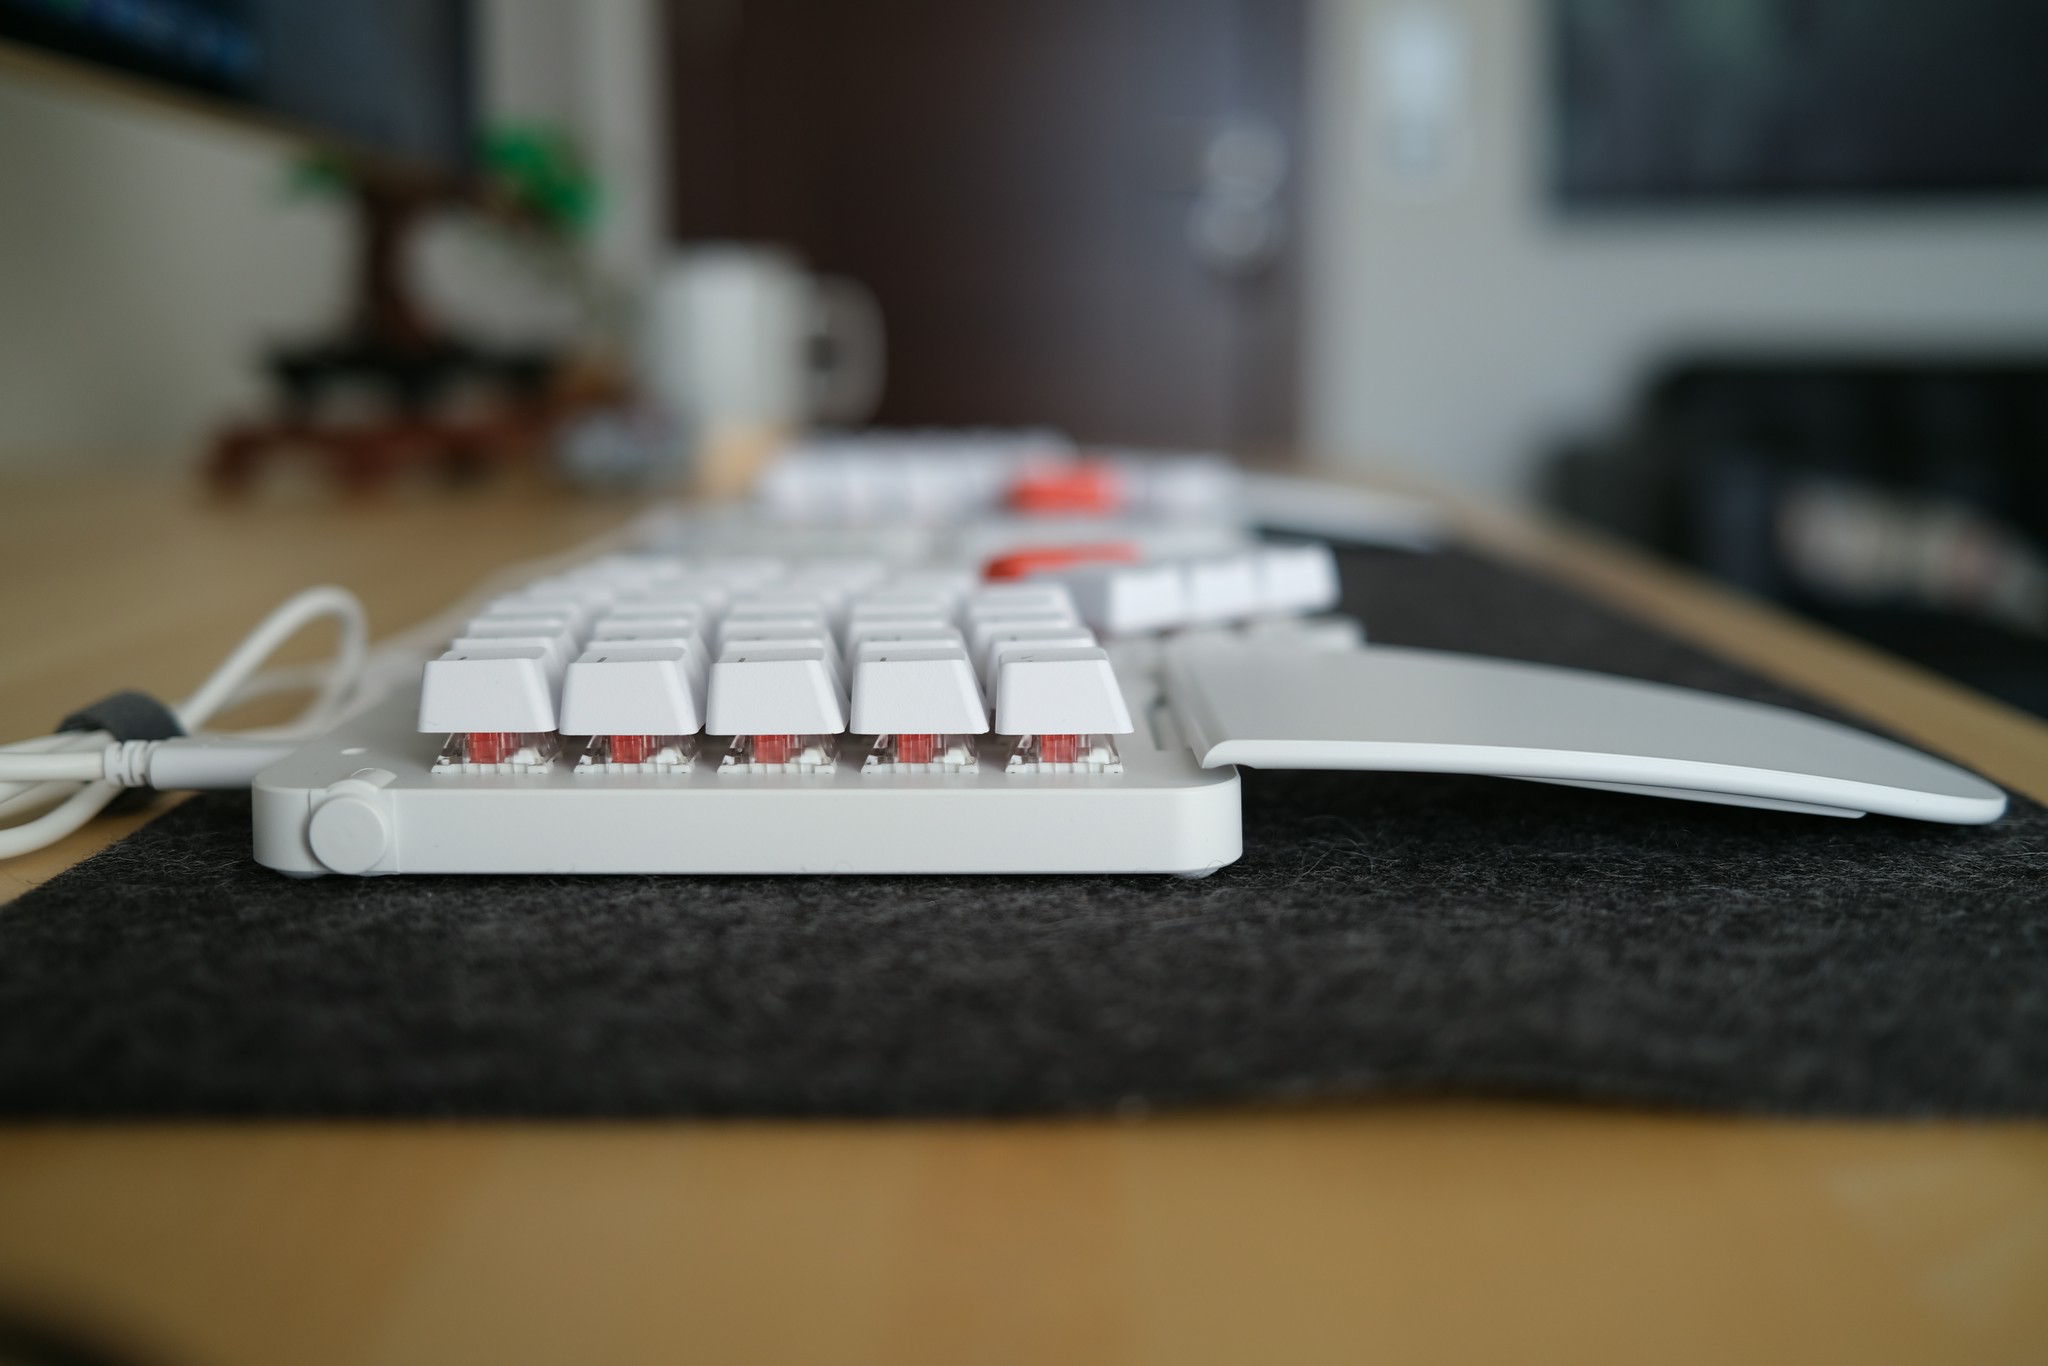
I ordered mines with the Kailh BOX Red switches. These are linear switches, and I like the feeling of them. I didn't use many other switches, but I know that these are better than MX Clear switches that I used before. They feel nice, are not noisy as clicky type switches, and due to the box styles, there is no wobbling either. The Moonlander's key switches are also hot-swappable. Hot-swappable keys can be switched manually without soldering. When you buy a Moonlander, it comes with a tool that makes it easy to pull out the keycaps and switches.
Original keyboard layouts are also staggered. If you look at your keyboard, you'll see that the qwerty row doesn't line up perpendicular to the bottom or top row. This layout is a remnant of old times when the levers of typewriters had to be arranged to prevent them from running into each other. Every single keyboard on the market continues to adhere to this old tradition.
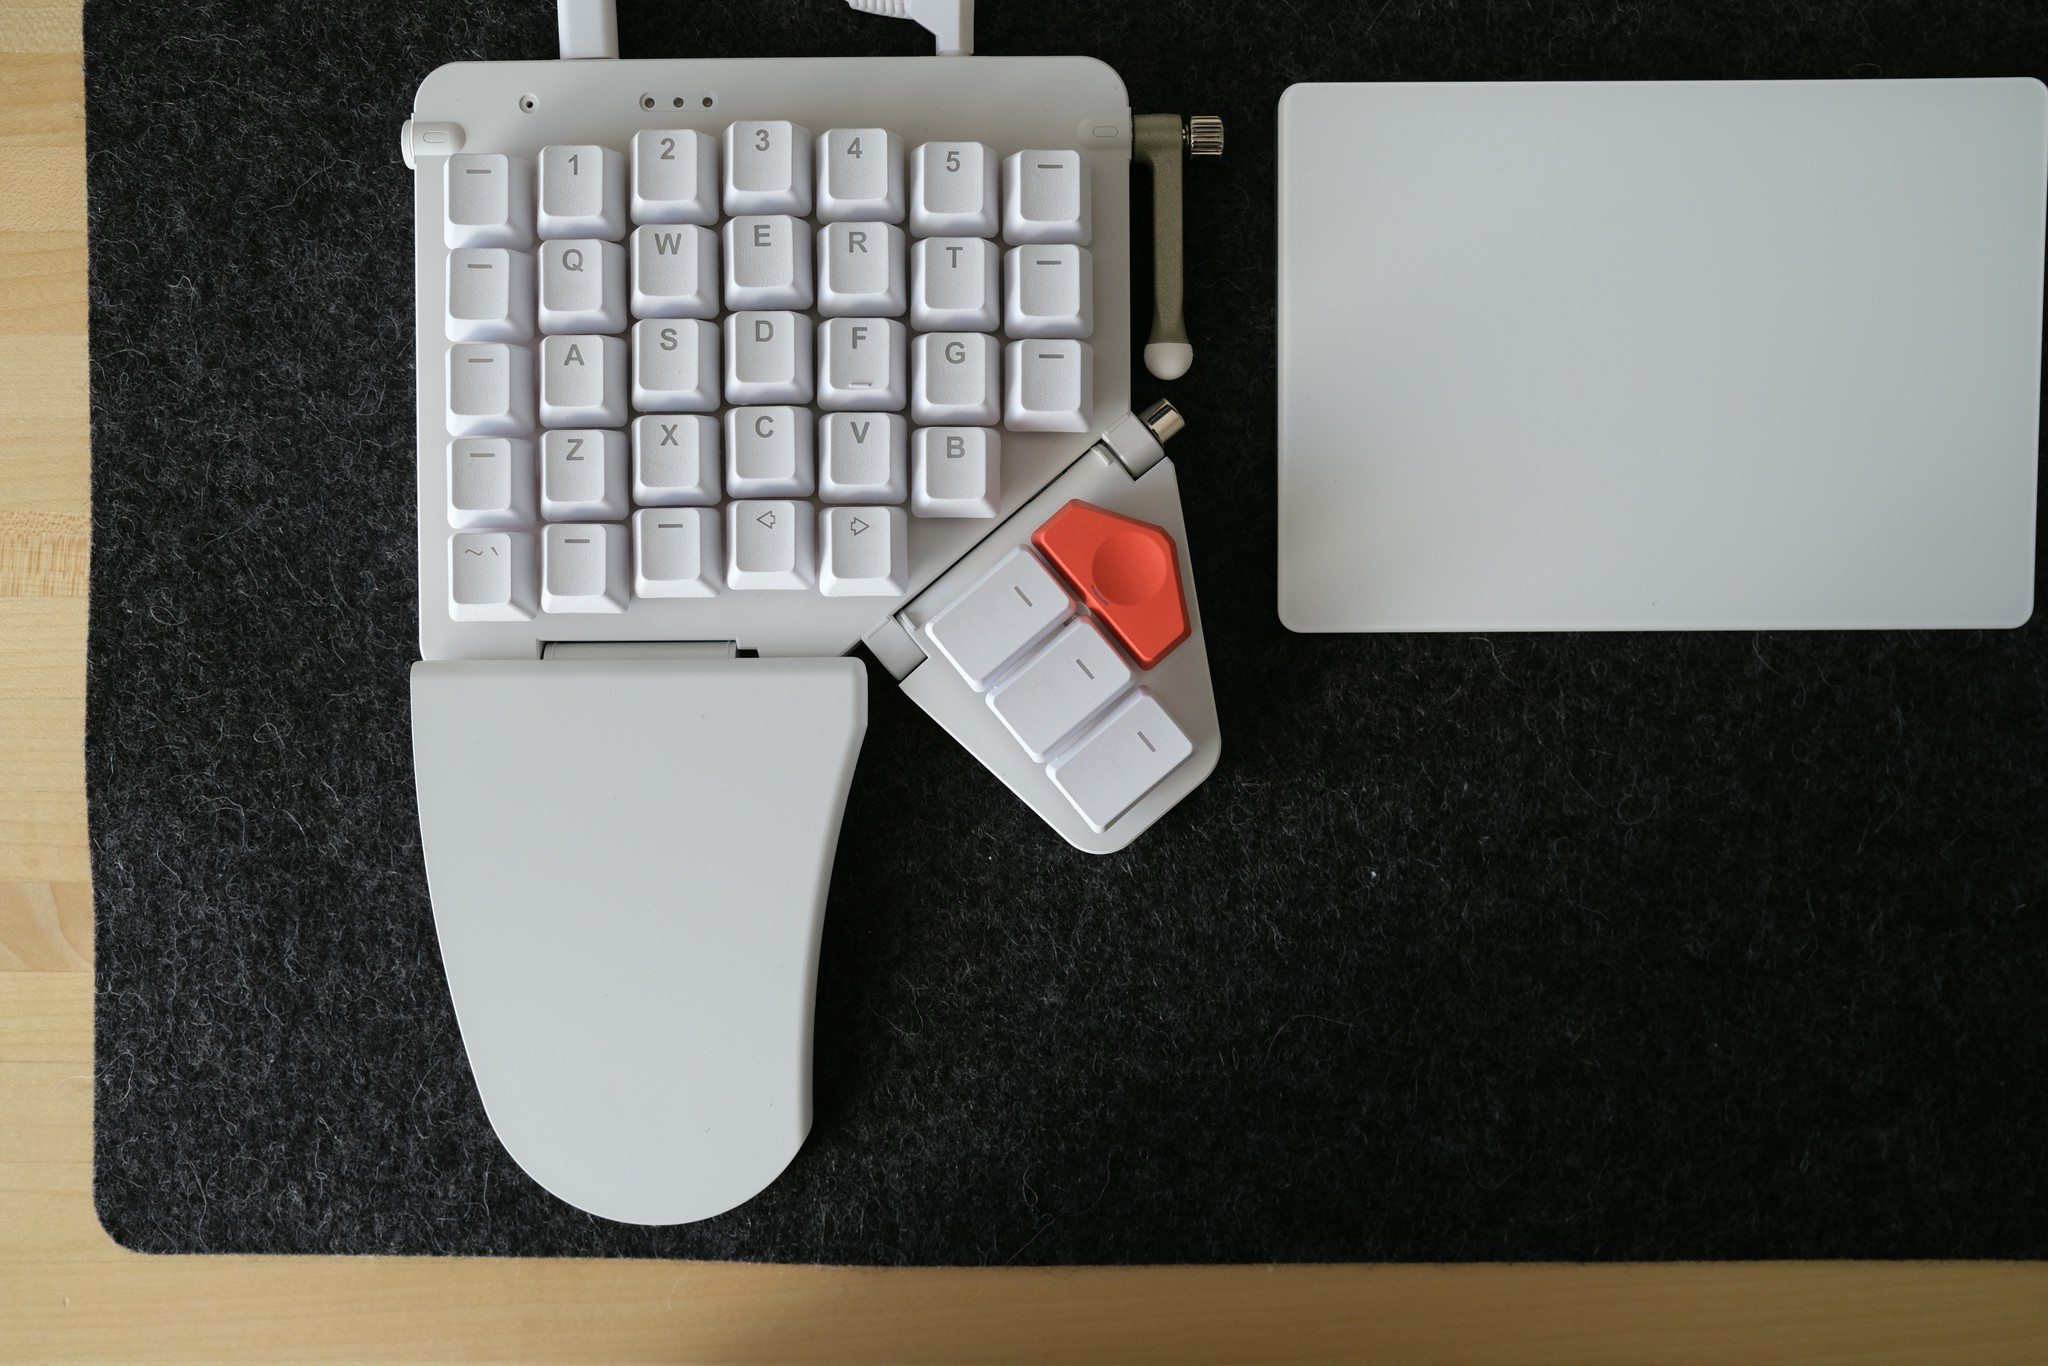
However, as you see from the Moonlander, it's not like that. It's a column-staggered keyboard. The keys are aligned in vertical column and there is no horizontal staggering. This reduces unnecessary lateral finger motion. Though, I'll explain in a bit why I think this is still not enough.
What sets the Moonlander apart from other keyboards is the thumb cluster. In ordinary keyboards, we use our thumbs only for hitting the spacebar. But that's not the case with the Moonlander. Now dozens of keys are under both of your thumbs. This layout is great because you can move all your frequently used keys to this cluster and reduce the stress on your other small fingers.
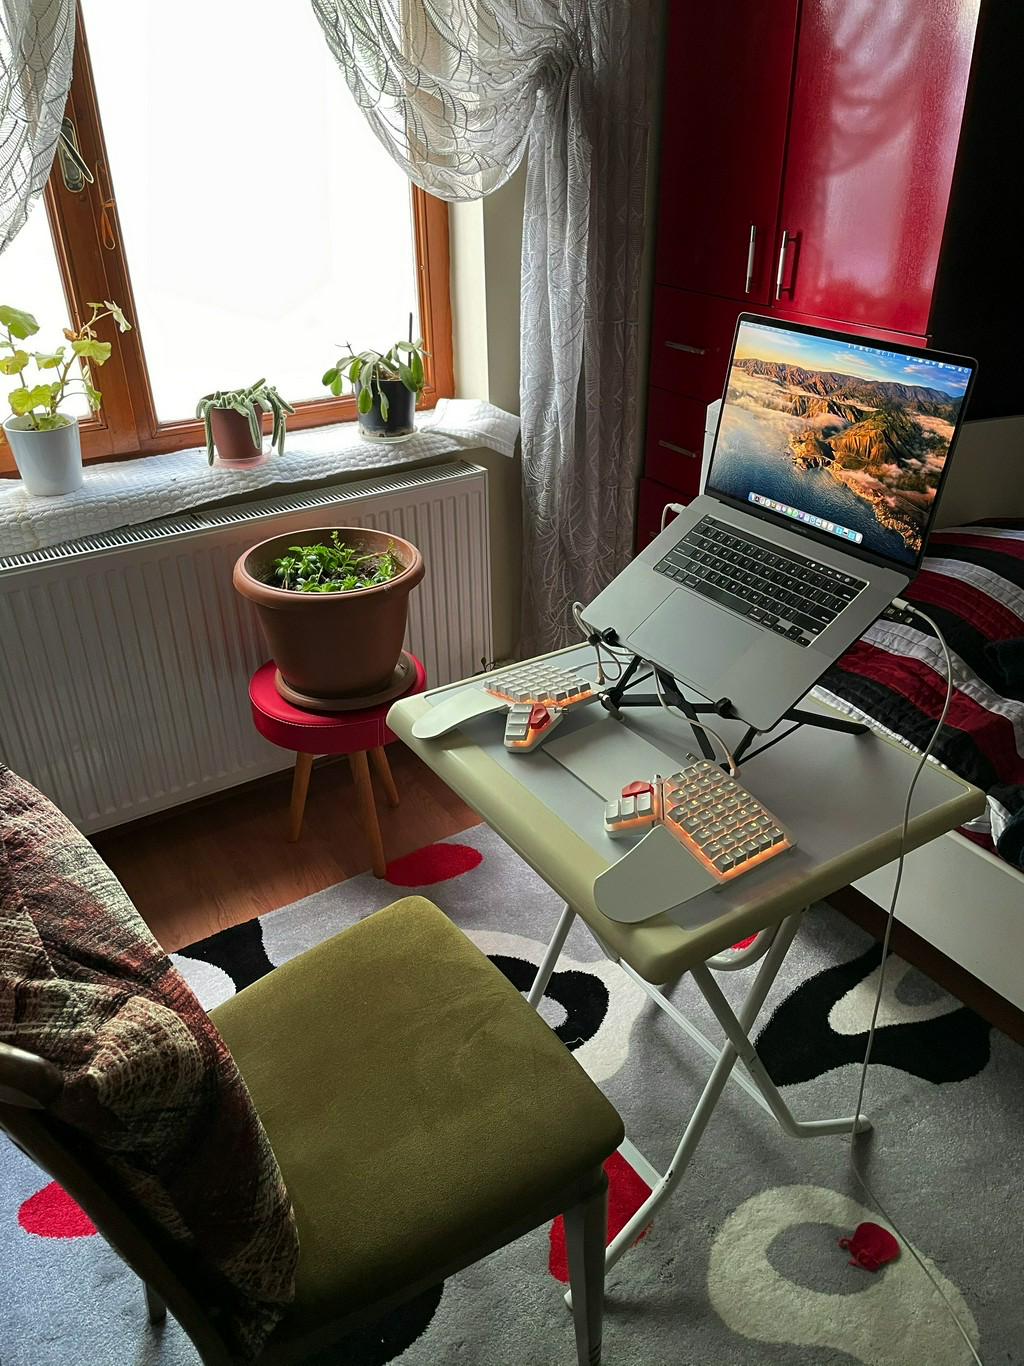
The wrist support module, also called the wing, is another helpful addition. What I like about the wing is that you can fold it underneath the keyboard base. Folding the wings allows you to carry the Moonlander wherever you want. It also comes with a Neoprene carrying case to safely travel with your keyboard if you wish. I never thought about traveling with my keyboard, but it looks like once you start using an ergonomic keyboard, you never want to touch another keyboard in your life.
Finally, one of the most significant selling points of the Moonlander is the customizable, open-source firmware called QMK. QMK is used and runs nowadays on pretty much all the custom mechanical keyboards. The integrated firmware allows you to configure your keyboard without relying on your Operating System. This tight integration means that you can remap keys, add shortcuts and layers and configure them to your liking. Wherever you go, once you plug in your keyboard, all your settings will be available. You don't have to fiddle with your OS settings anymore manually. Let me tell you more about this, as I think it deserves its section.
Layout configuration
The Moonlander comes with its configurator called Oryx. It's a web app that you can use to configure your keyboard (such as remap a key). Under the hood, it compiles the QMK firmware in the cloud, which you can then download and use their tool Wally to flash your keyboard. They all play nicely, and I never had an issue.
When I first got my keyboard, I started using the default layout. But many friends have suggested that I try to modify my configuration because it's easy to do. Moreover, what's the point of using this keyboard if we don't bother to improve it for our liking?
Before I show my layout, let me tell you about layers (for those that never used them before). A layer entirely changes all the keys on your keyboard once you click on a specific key. In most keyboards, you'll find an fn key that works quite similarly. In QMK, this allows you to remap keys into different commands and keys.
Let me show my current setup. First is the main layer:
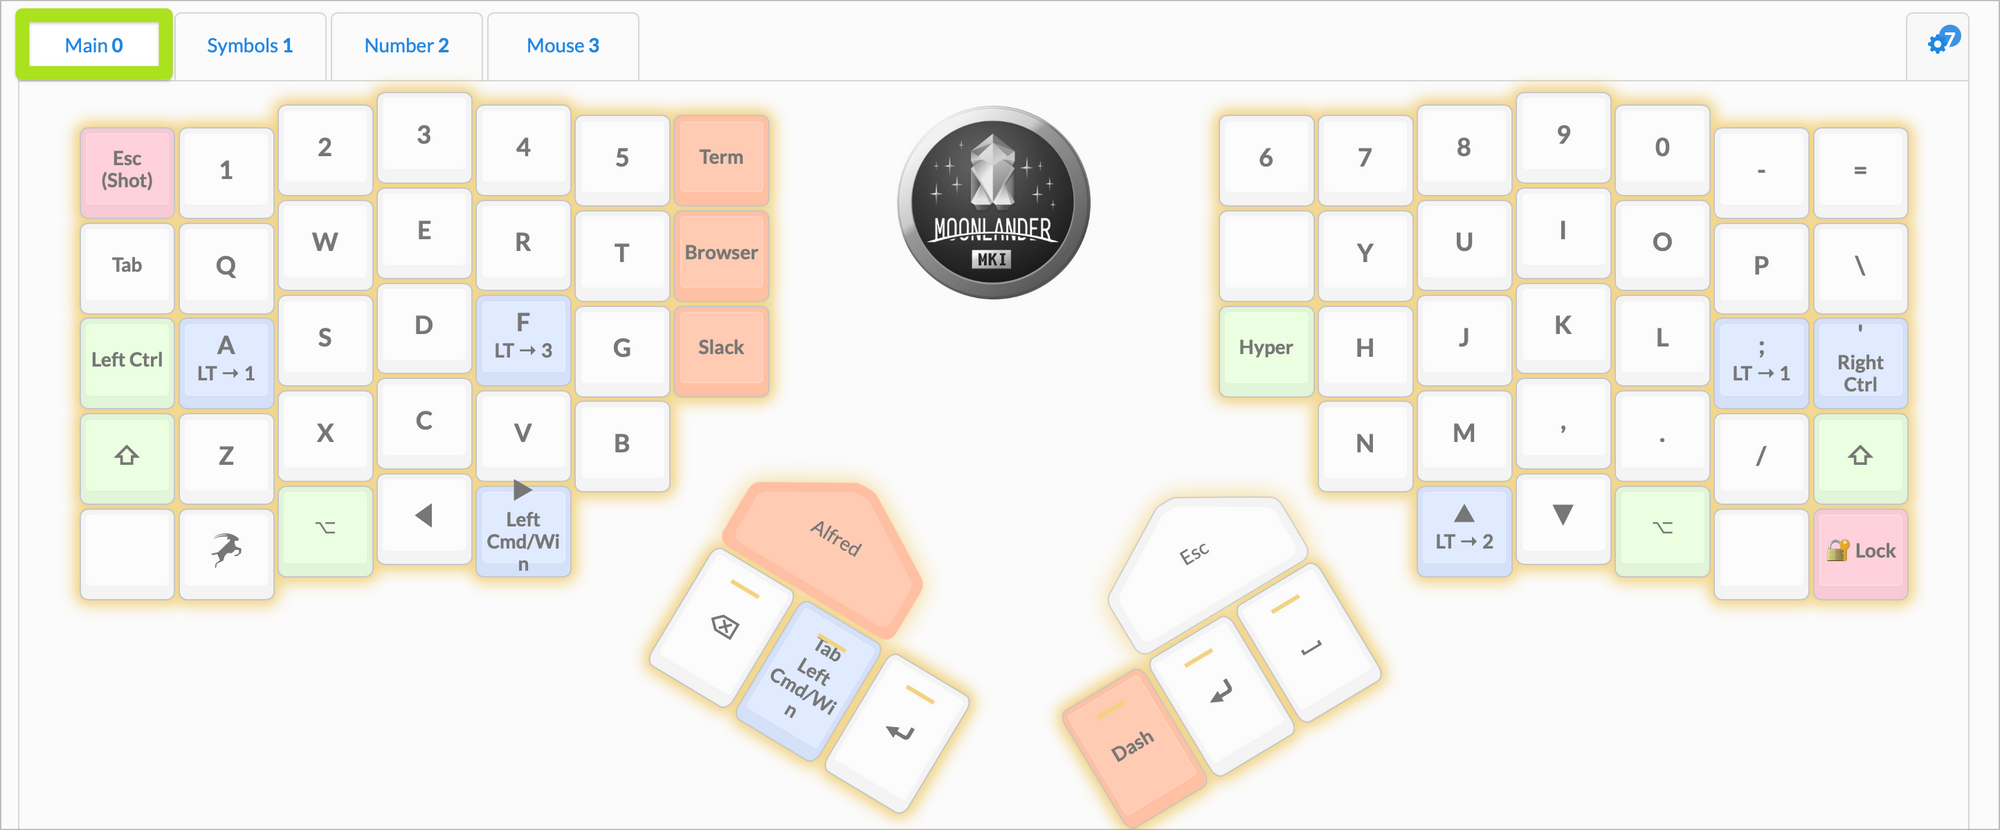
There are quite a lot of changes here. Let me go over these:
- I have a lot of Tap and Hold keys. These keys have two options. When you tap on them, it sends the first command/character, and if you hold them, it acts as a different key. For example, both my
Aand;keys, when I hold them, switch to the next layer where I have all my symbols. But, tapping sends the appropriate character. - Caps lock is remapped to Ctrl (I use it like this already for a decade). I also made the
'key a Tap and Hold key to use the right side for a more comfortable combination, such asCtrl+g. - I couldn't find a good place for the
Cmdkey. So, I made it a Tap-and-Hold key with the>(right arrow). - The backspace and space buttons are under my thumbs. I shuffled the space a couple of times from the right side to the left and now back to the right side. I can't decide which is the best, but eventually, I'll settle down on something.
- Furthermore, I have a couple of shortcuts that I labeled, such as Term, Browser, Slack, Alfred, etc. QMK allows you to configure a single key to send a combination of keys. For example, when I press on the key labeled with
Alfred, it sends acmd + spacecombination. I also used Alfred Workflows functionality to assign shortcuts to open applications directly. To open the Browser (Safari), I'll have to press usuallyctrl+1, but because the Moonlander has so many keys, I assigned dedicated keys for them. Now, I don't have to do thecmd + tabto switch and hunt for applications.
The second layer is Symbols:
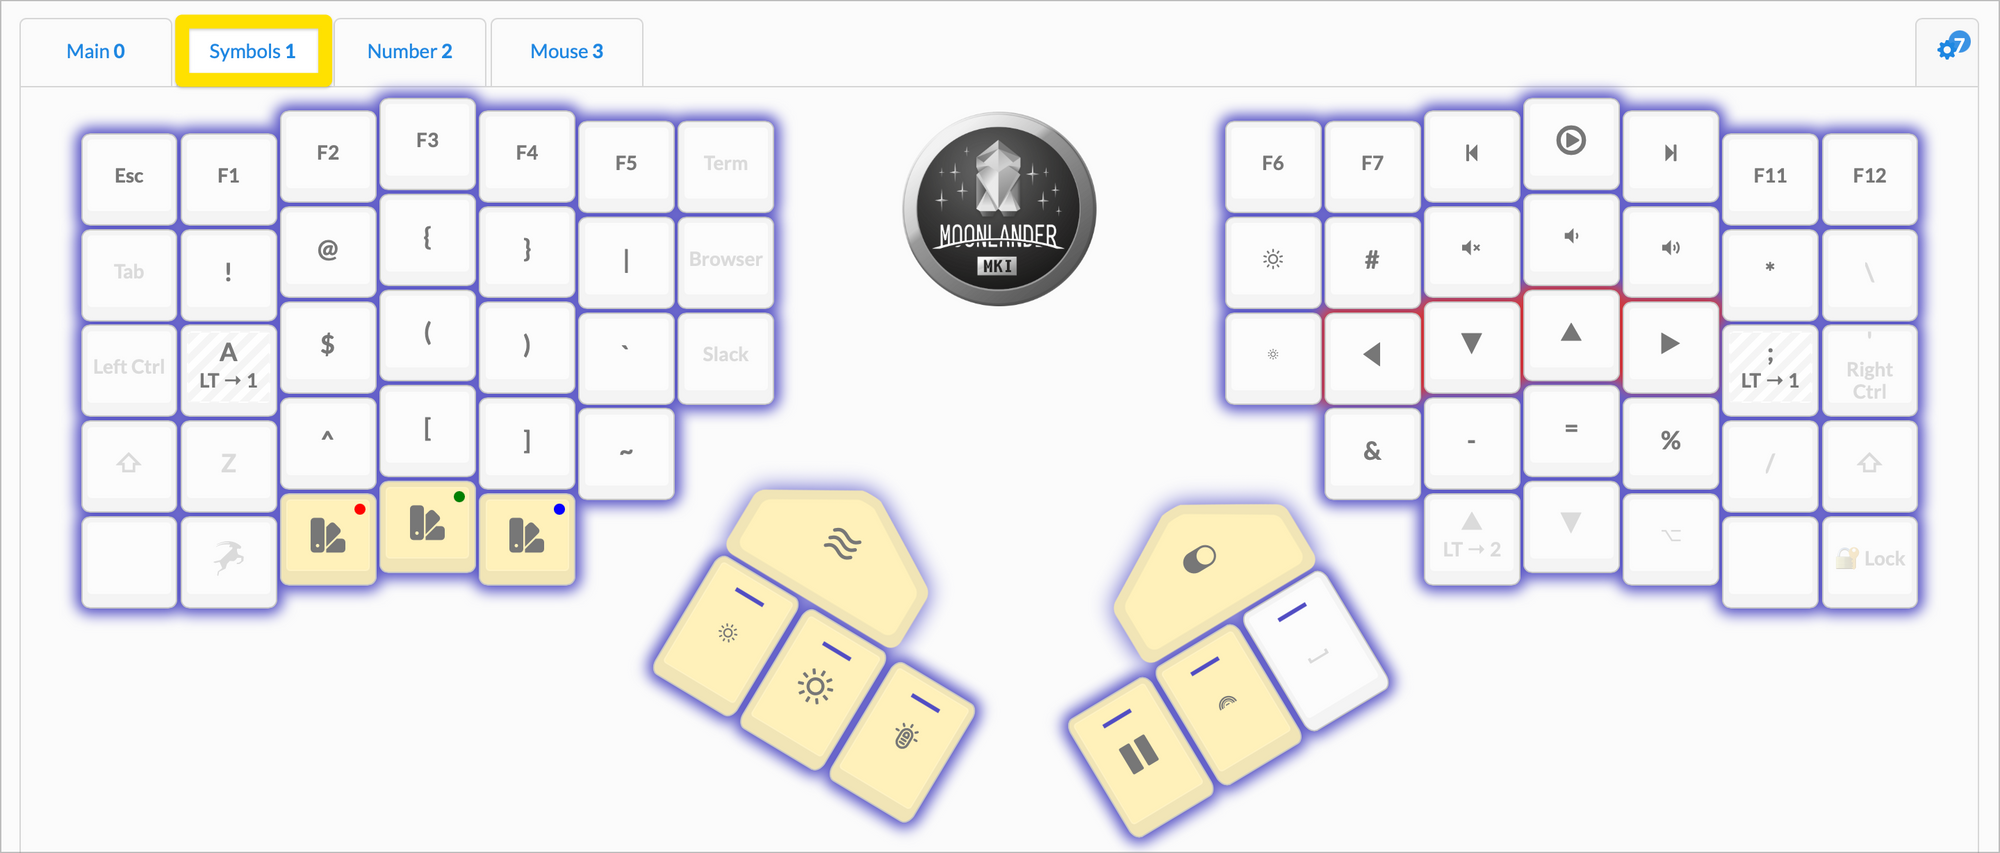
I use this layer a lot, and hence I have two Tap-and-Hold keys that allow me to switch to this layer. What are some of the changes I made here:
- As a Vim user, I'm used to the HJKL keys to navigate through the code. It's very natural for me. I couldn't use the default arrow values on the Moonlander, so I mapped HJKL to the left, down, up, and right arrows.
- I added multiple multimedia and standard keys to this layer. Such as the mute, multimedia, and brightness buttons.
- Previously, I would always hunt for some symbols, such as #, $, %, @, etc. But now, all these symbols are just under my left hand. If I press
; + w, it switches to the second layer, and the@character is selected. I'm honest; it wasn't easy at all in the beginning. But I stuck with it, and now I think why I didn't start it earlier.
The third layer is called Numbers (I think Numpad is a better name):
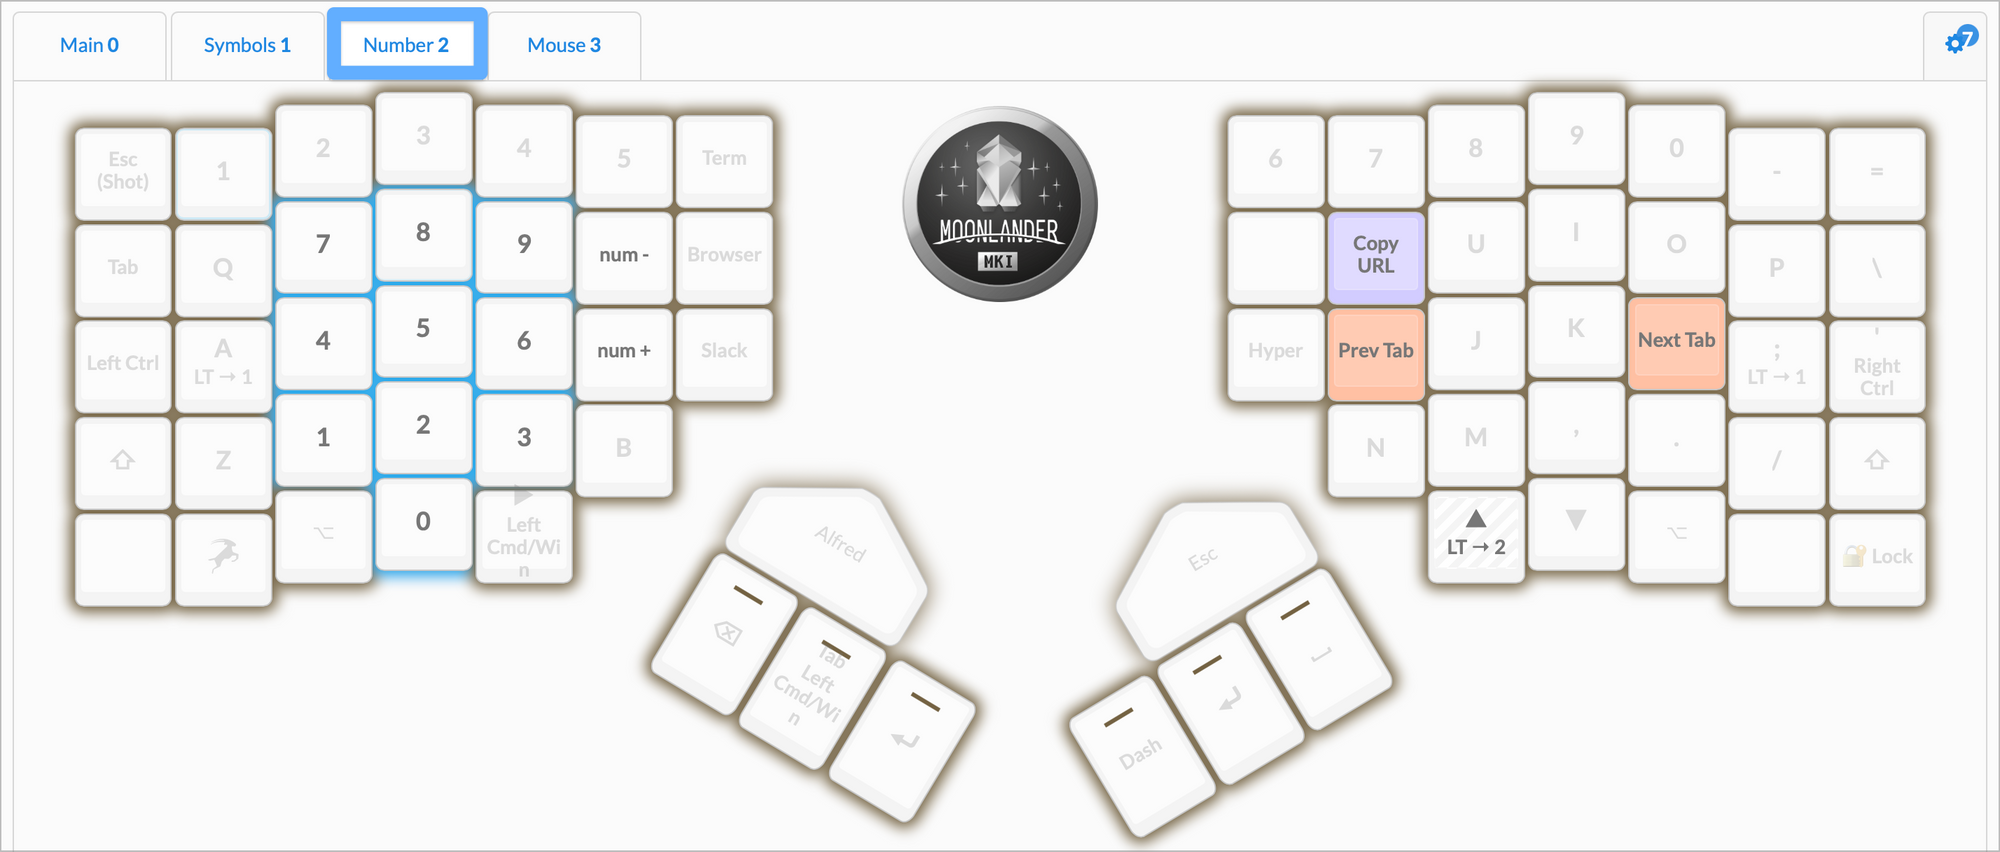
- This layer has a dedicated Numpad area. It's pretty new, and I'm not using it often. But it's pretty handy compared to the upper number row.
- I also added a couple of shortcuts, which invokes a couple of macros. For example, the Copy URL key selects the address bar in the Browser, selects all text, and then copied it. It's something I do a lot, and this comes in handy.
Making these modifications was easy due to the Orxy GUI, but learning the new layout properly took a long time. Let me explain in the next section how much time I spent learning this new layout.
Re-learn how to type
I never learned proper touch typing. My typing style developed over the years, and it's just chaos. I still use all my fingers, but not in the way it should be. When I received the Moonlander, I decided that I should start learning proper touch typing. Because the layout and style of Moonlander were so different, it took some time, but I could quickly learn to type correctly. How did learned typing:
- I started using the https://www.typingclub.com/. This website teaches you all the familiar ANSI characters one by one. I'm not too fond of the learning style, but it does its job.
- Once I could hit the characters without looking at the keyboard, I started to use https://www.keybr.com/. This lets you type gibberish words, but based on the characters you typed in the past. If you're making mistakes, it adds words containing the characters you would miss in the past. That's why it's lovely because it forces you to learn from your mistakes and spent time fleshing them out.
- Nowadays, all I use is https://monkeytype.com/. This is a minimalistic typing test with a highly customizable type suite. You can open an account (which I recommend doing), and it saves all your tests. By default, you have to type for 30 seconds in plain English. Later once you got to a certain speed, you can select other modes. I, for example, switched to English 1K and later to English 10K (the most common then thousand English words). There are also exoteric modes, such as
only numbersorpunctuations, etc.
All these typing test websites make sure you increase your WPM, short for Words per minute. The WPM is a pretty basic metric that calculates how many words you can type per minute.
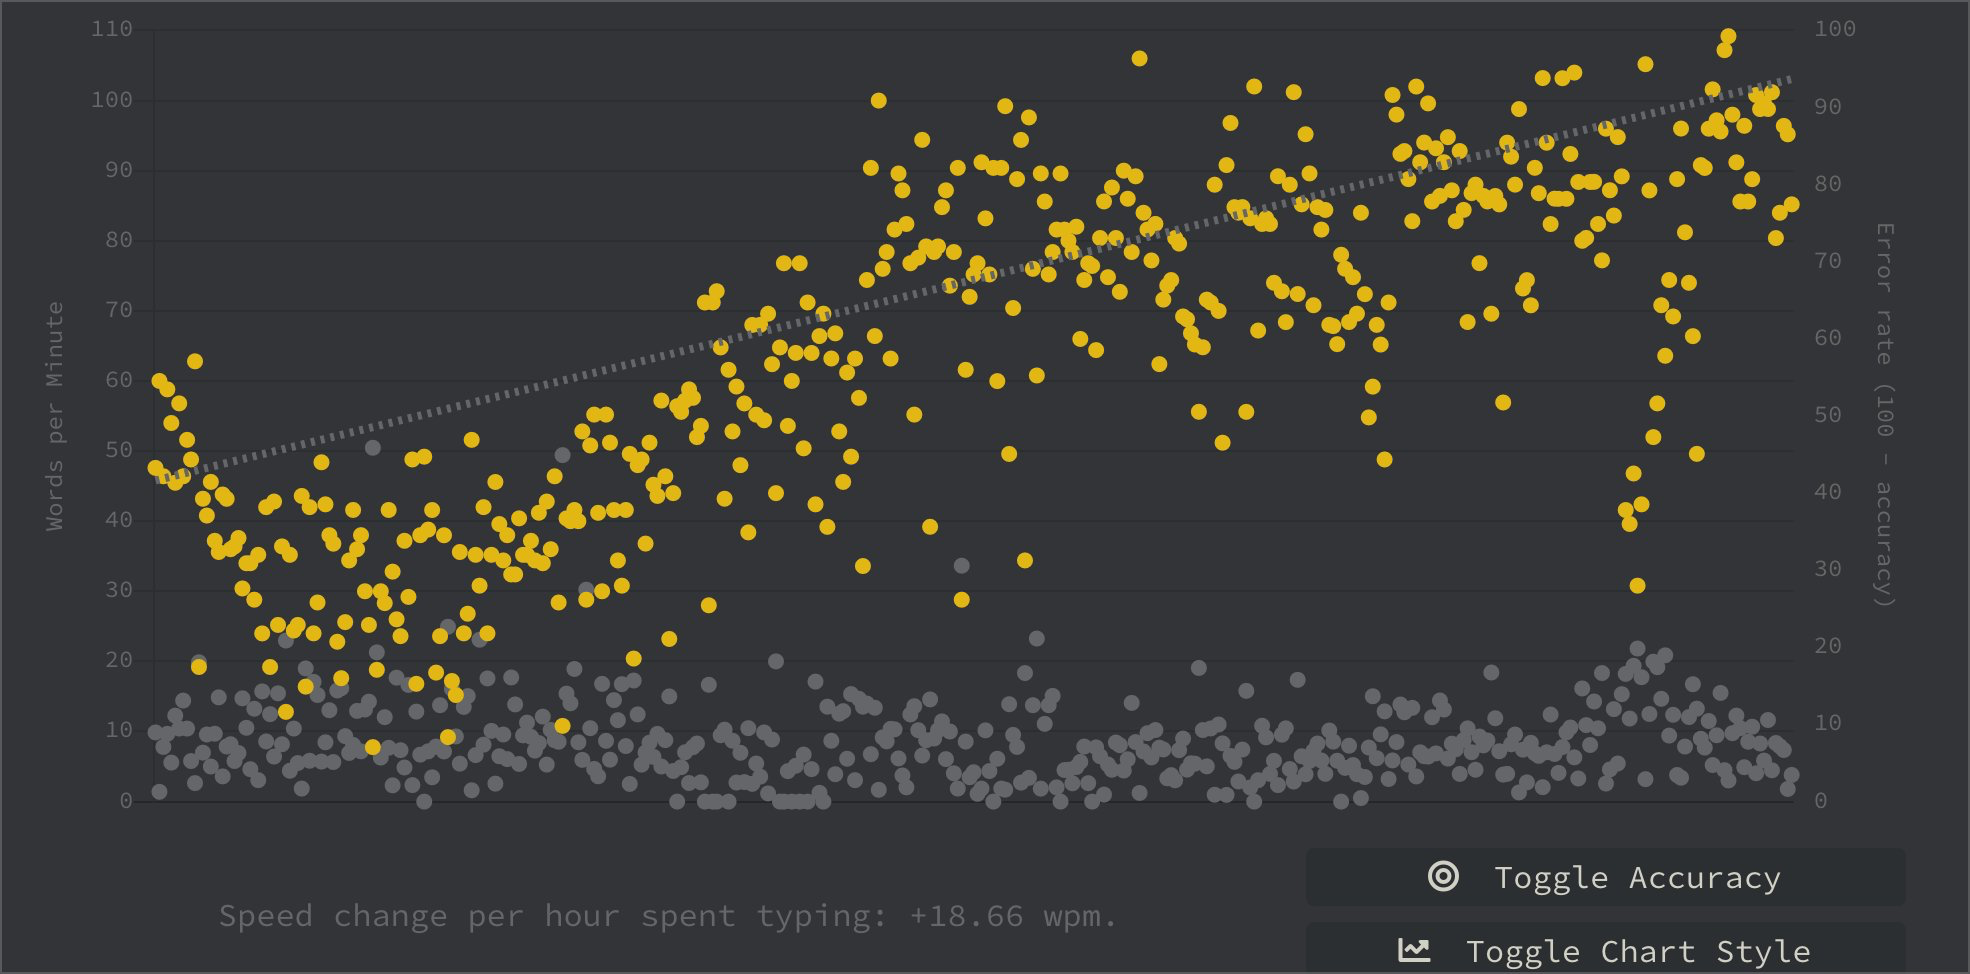
With the Moonlander, I started typing around 20-30 WPM first. It was a hit or miss. I spend around one or two hours per day typing on monkeytype.com. With time and practice, my typing speed increased a lot. Do I still miss the Apple Keyboard? Definitely yes! The reason was that my writing habit and, therefore, shortcuts had defined my past eight years. With a new keyboard, you suddenly start feeling everything is falling apart. It took me like two minutes to write a proper if predicate in one of the projects I was working on. But, my health was more important for me. I just stuck and spent practicing every single time.
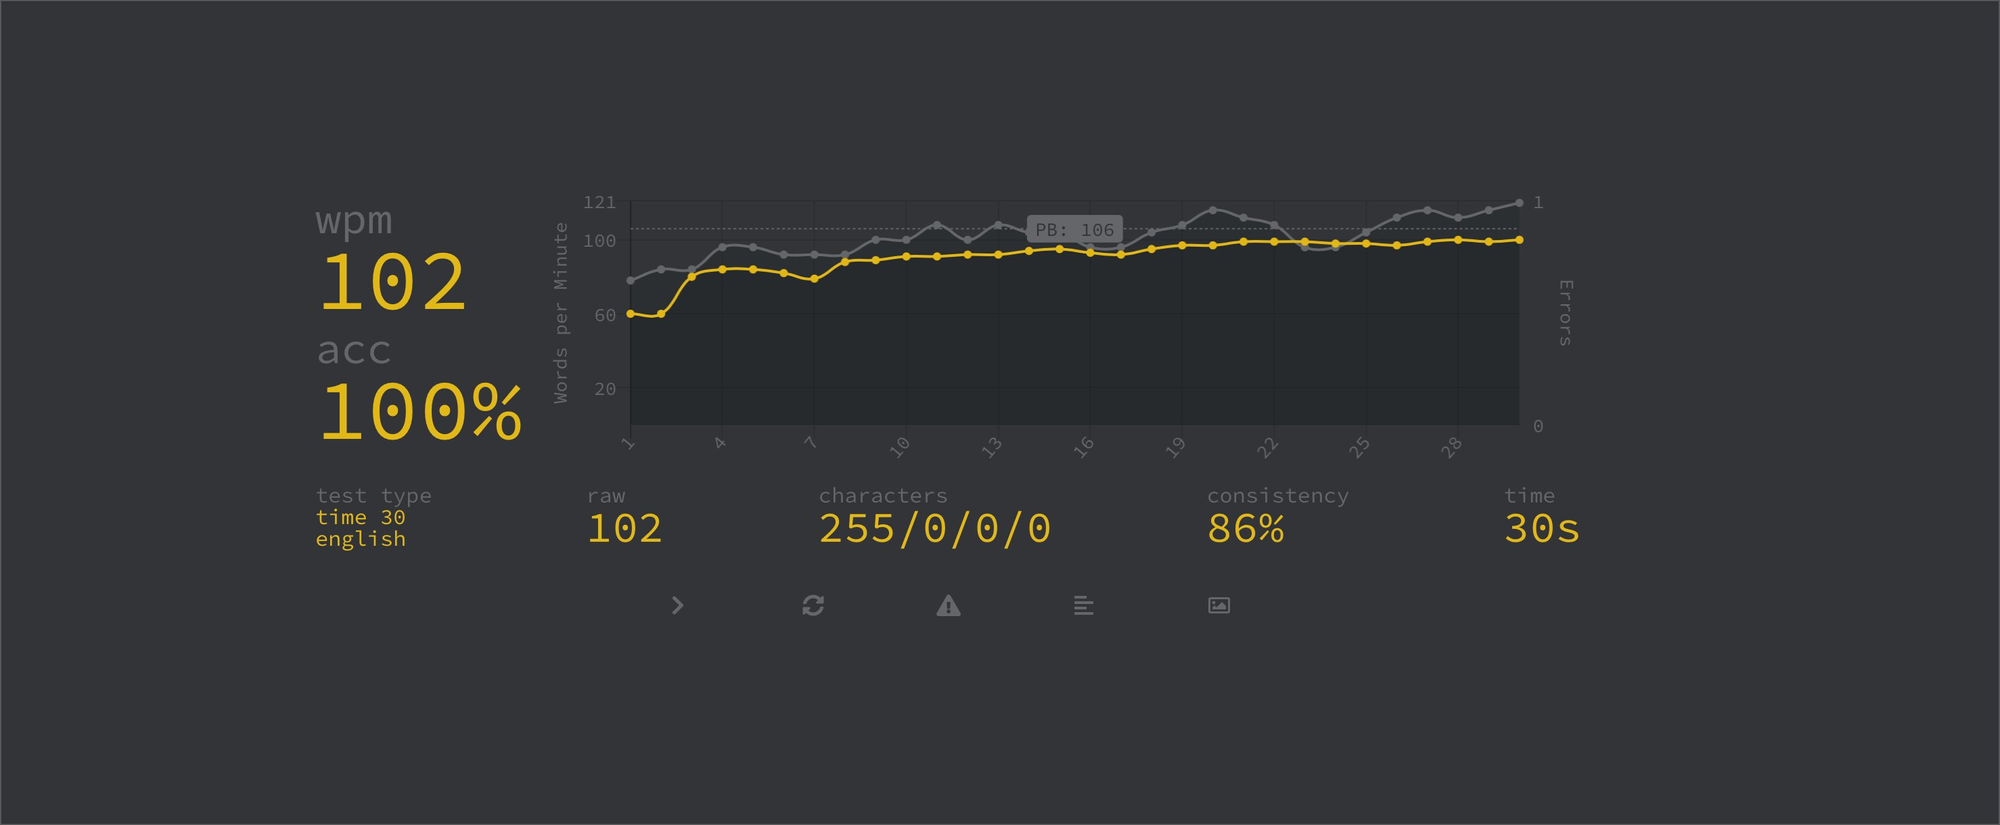
After constantly working for a month, I could type at 100 WPM with a 100% accuracy! Hitting this milestone was great, and I never went back to the Apple Magic Keyboard since then. I could comfortably write with the Moonlander.
So, now that I could type proficiently, what do I think about the Moonlander?
I think the Moonlander works well for me. It opened a whole new world for me and made me a better typist. Most importantly, I can write without any pain. Since I start using the Moonlander, I don't have any wrist, hand, or shoulder pains anymore. I wish it were that easy, but it is.
Are there any disadvantages? What are some areas it can be better? Let me explain.
Disadvantages of using the Moonlander
Let me first start with the tilting mechanism. Our hands are not flat. If you rest it naturally, you'll see that it resembles a cave. Tenting mechanisms make it easier to wrap the keyboard with our hands.

The first problem I have with the Moonlander is, mainly due to my small hands, how big it is and how uncomfortable it is to use the thumb cluster. There are four keys on the thumb cluster, and I can only use one/two keys comfortably. The other keys are definitely out of my reach. To reach them, I'll have to hover my hands entirely from the wrist pad. ZSA recommends articulating the thumb cluster up. But the problem with this solution is that the rest of the key is now totally flat.
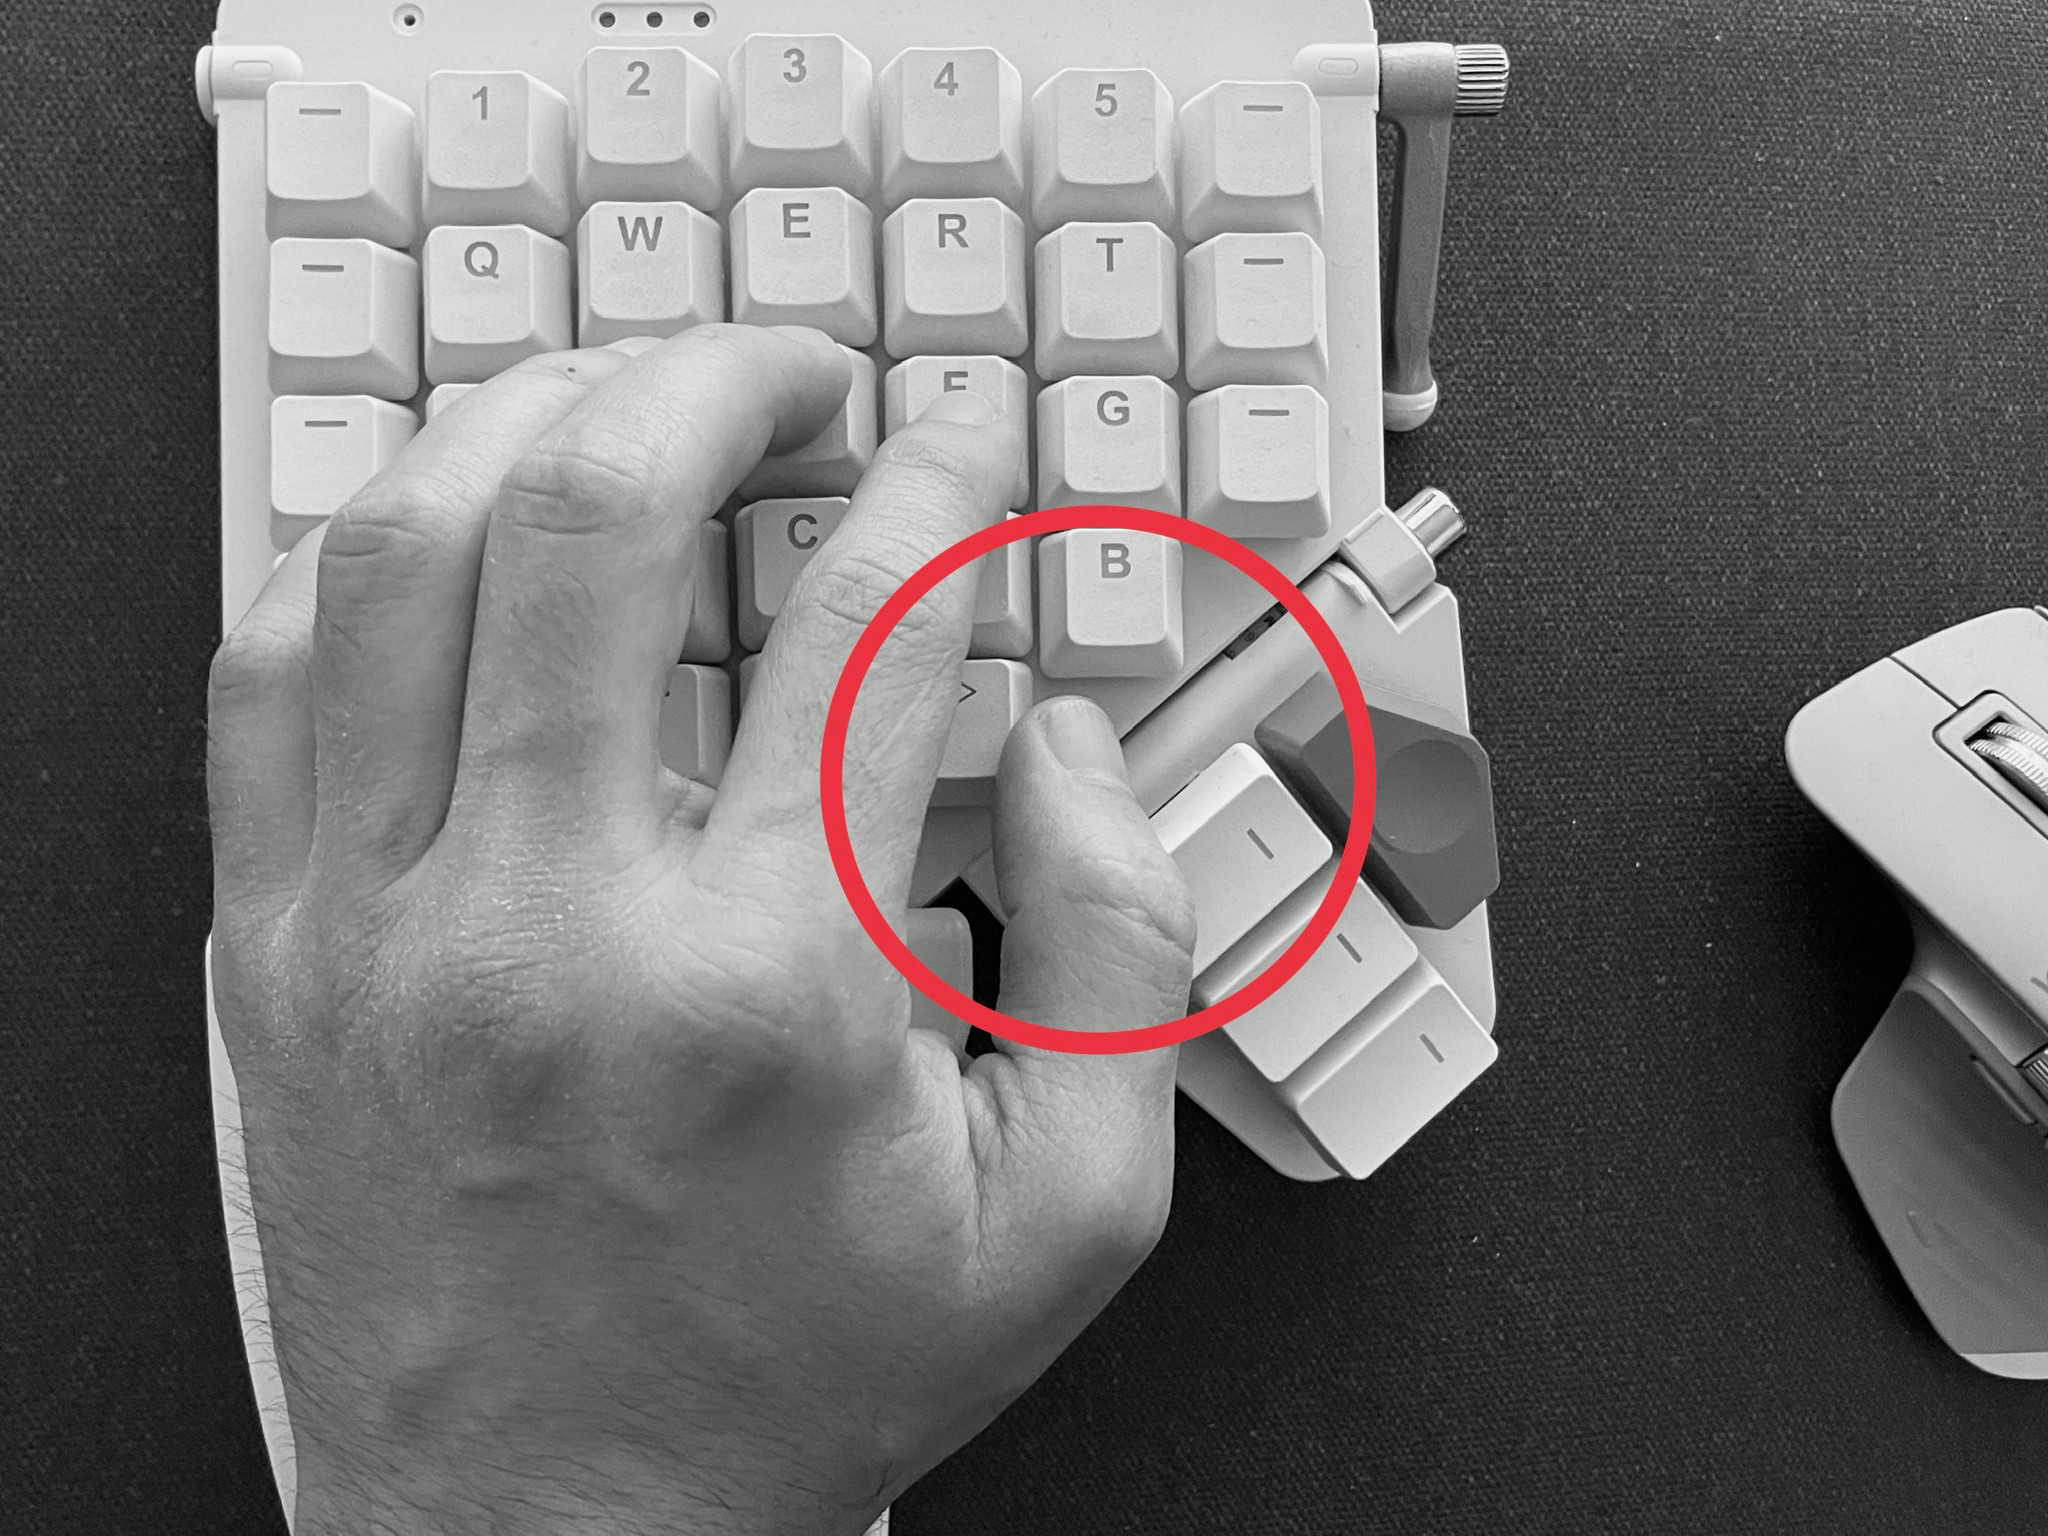
If you carefully look above, you'll see in the picture that my thumb rests just in the middle of the main base key are and the thumb cluster. I need to stretch my thumbs a bit. Stretching is not an issue for medium or large hands, but people with small hands and wrist like mines don't work well. As a comparison, I used a website that compares various split keyboard designs, and here is an image that shows the difference between Moonlander and Kyria (another popular Split Keyboard):
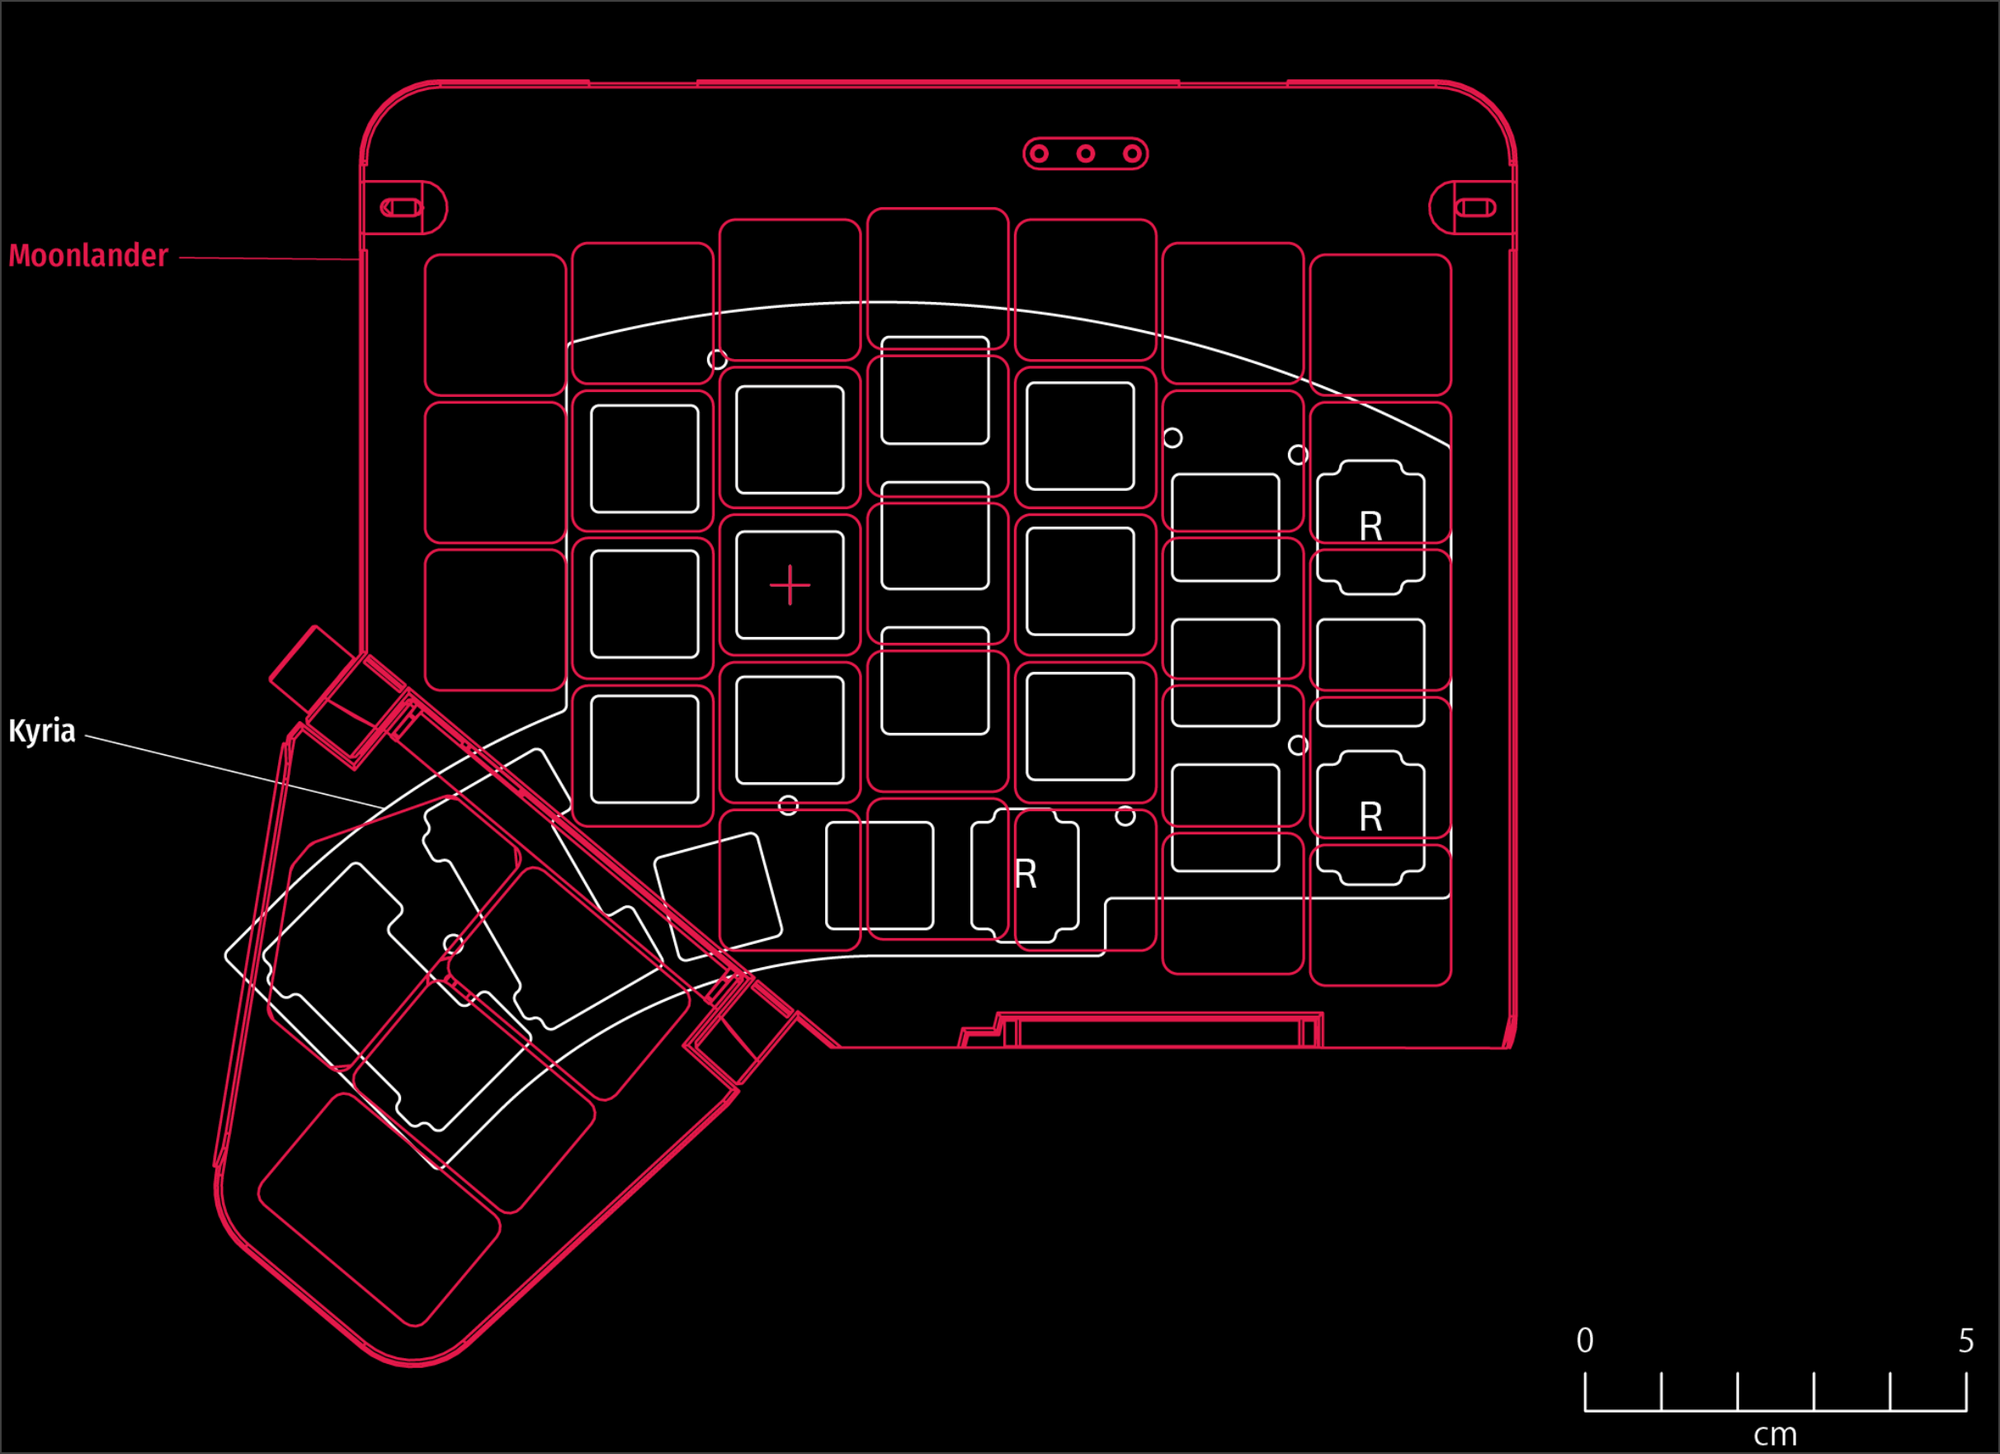
You'll see immediately how the Thumb cluster is more prominent and further compared to Kyria. You can select other split keyboard designs on the website. Most of them have solved this issue. But Moonlander (and its predecessor, Ergodox), have the same problem. I was surprised to learn this because Ergodox has a similar design, and one would think the thumb cluster would fix it at some point.
Another issue is the Staggering. Moonlander has one benefit over other keyboards that the keys are aligned vertically in a columnar fashion. But there is staggering horizontally to make sure that all four fingers are adequately aligned. An ergonomic keyboard has to make sure that the keys are easy to reach out.
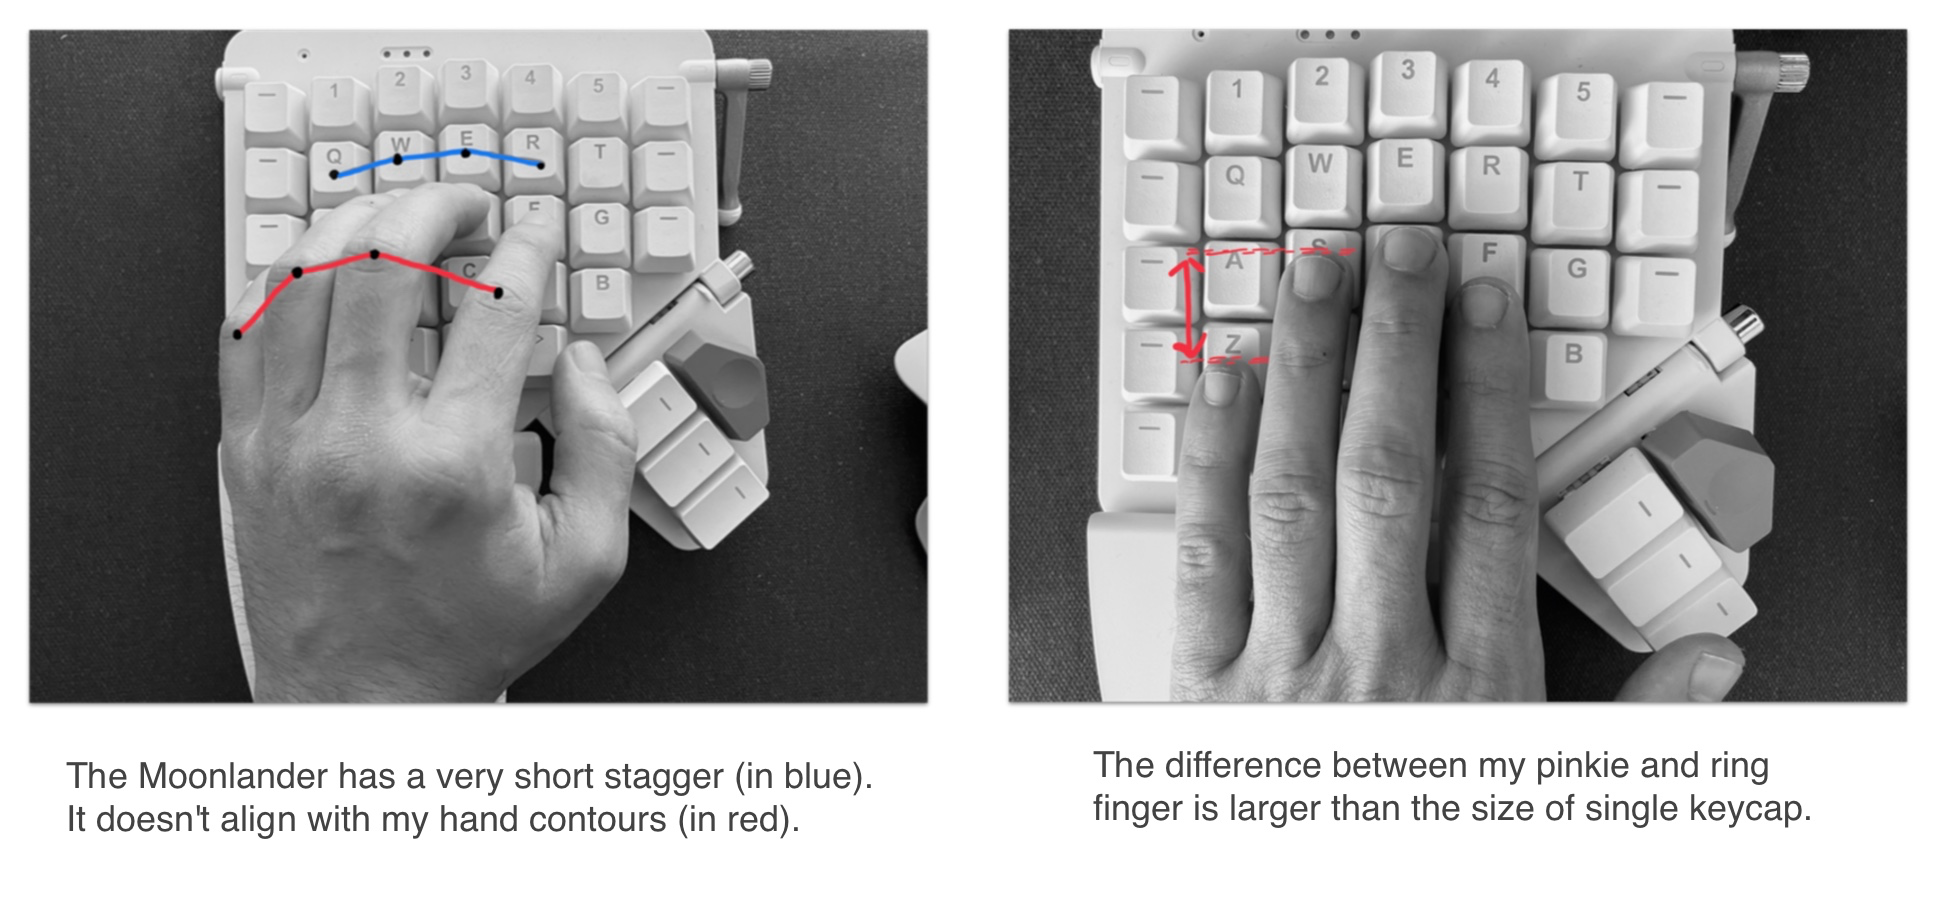
If you rest your hands on the Moonlander, you'll discover that the horizontal Staggering is not enough. There is almost a single keycap gap between the pinky and ring finger. This gap means that to reach the Q or P keys, you have to hover your whole hand and move forward. If you're planning to rest your wrist and try to reach those keys, you'll hurt your pinky fingers by stretching them. The staggering needs to be more aggressive and the whole Q column needs to shift at least half keycap.
People always choose form over function. To make it good-looking, they line up the keys so the keyboard doesn't look awkward. I understand that it's a great selling point, but it then introduces several limitations. The keyboard's selling point is ergonomy, and I think it doesn't meet these requirements.
I hope ZSA improves some of these pain points in the future. I had a couple of email conversations with them, and they were nothing but fantastic. The product quality is excellent, the support makes sure you're covered, and the docs/software, in my opinion, are all well-designed.
I'm looking forward to using one of their new designs that address these issues.
What's next
So, what's next? After using the Moonlander for almost 3.5 months, I decided to look for a keyboard that solves or fixes at least some of the pain points I have.
I never switched keyboards so fast because I always thought it would be challenging to make the switch. But now that I've seen firsthand that it's possible to get accustomed to a split keyboard with proper planning and exercising, It doesn't scare me anymore. I decided to do something different.
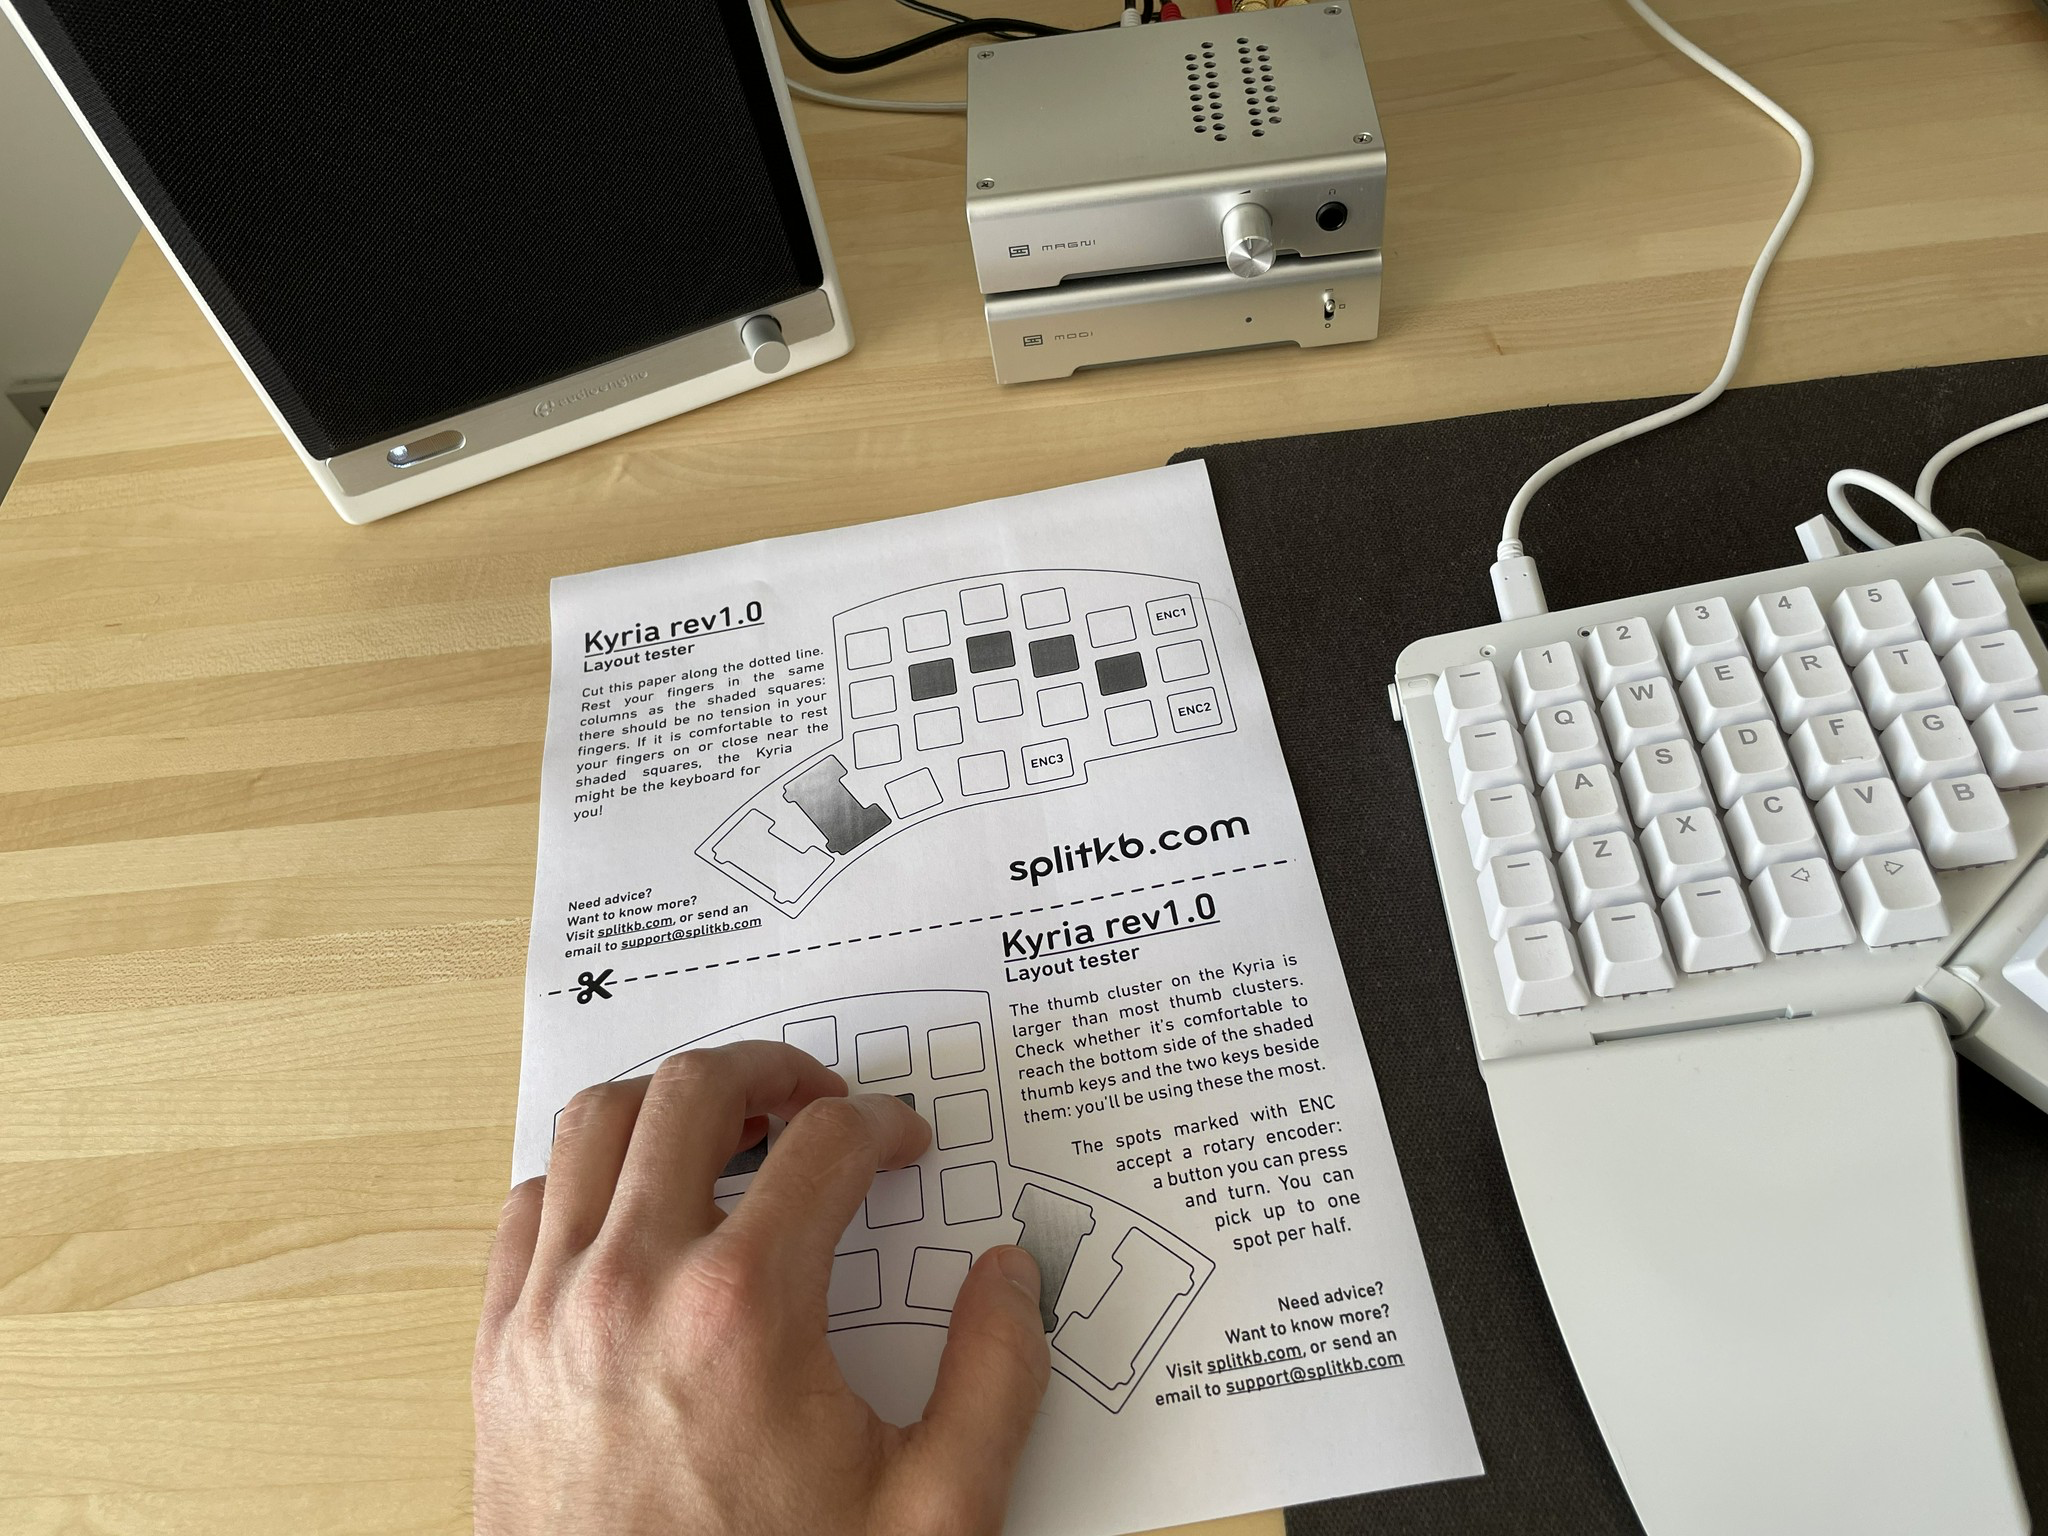
First, I printed the layout tester for the Kyria Split Keyboard. This keyboard caught my attention because it fixes all the issues with Moonlander. It was designed for small hands and pretty small (there is no number row, for example).
Please read the blog post because it mirrors my experiences quite a bit. This part of the blog post primarily covers one of my pain points:
The stagger is one of the things that makes the Kyria unique. Most keyboards don't have as aggressive a stagger as the Kyria has, the outer columns are noticeably lower than the other columns because the pinky is also noticeably shorter. I liked the feel this provided, so this would be kept in the design.
I ordered a Kyria PCB kit and all the required components to build the keyboard itself from splitkb.com. The Kyria will be my first DIY project. I don't even have a soldering iron, but it takes time to get them shipped to Turkey, so I ordered them right away.
Huge thanks to my friend Burak Yiğit Kaya, who owns an Iris Split keyboard. He convinced me to try out the Kyria due to its design for small hands and helped me to pick up the correct components.
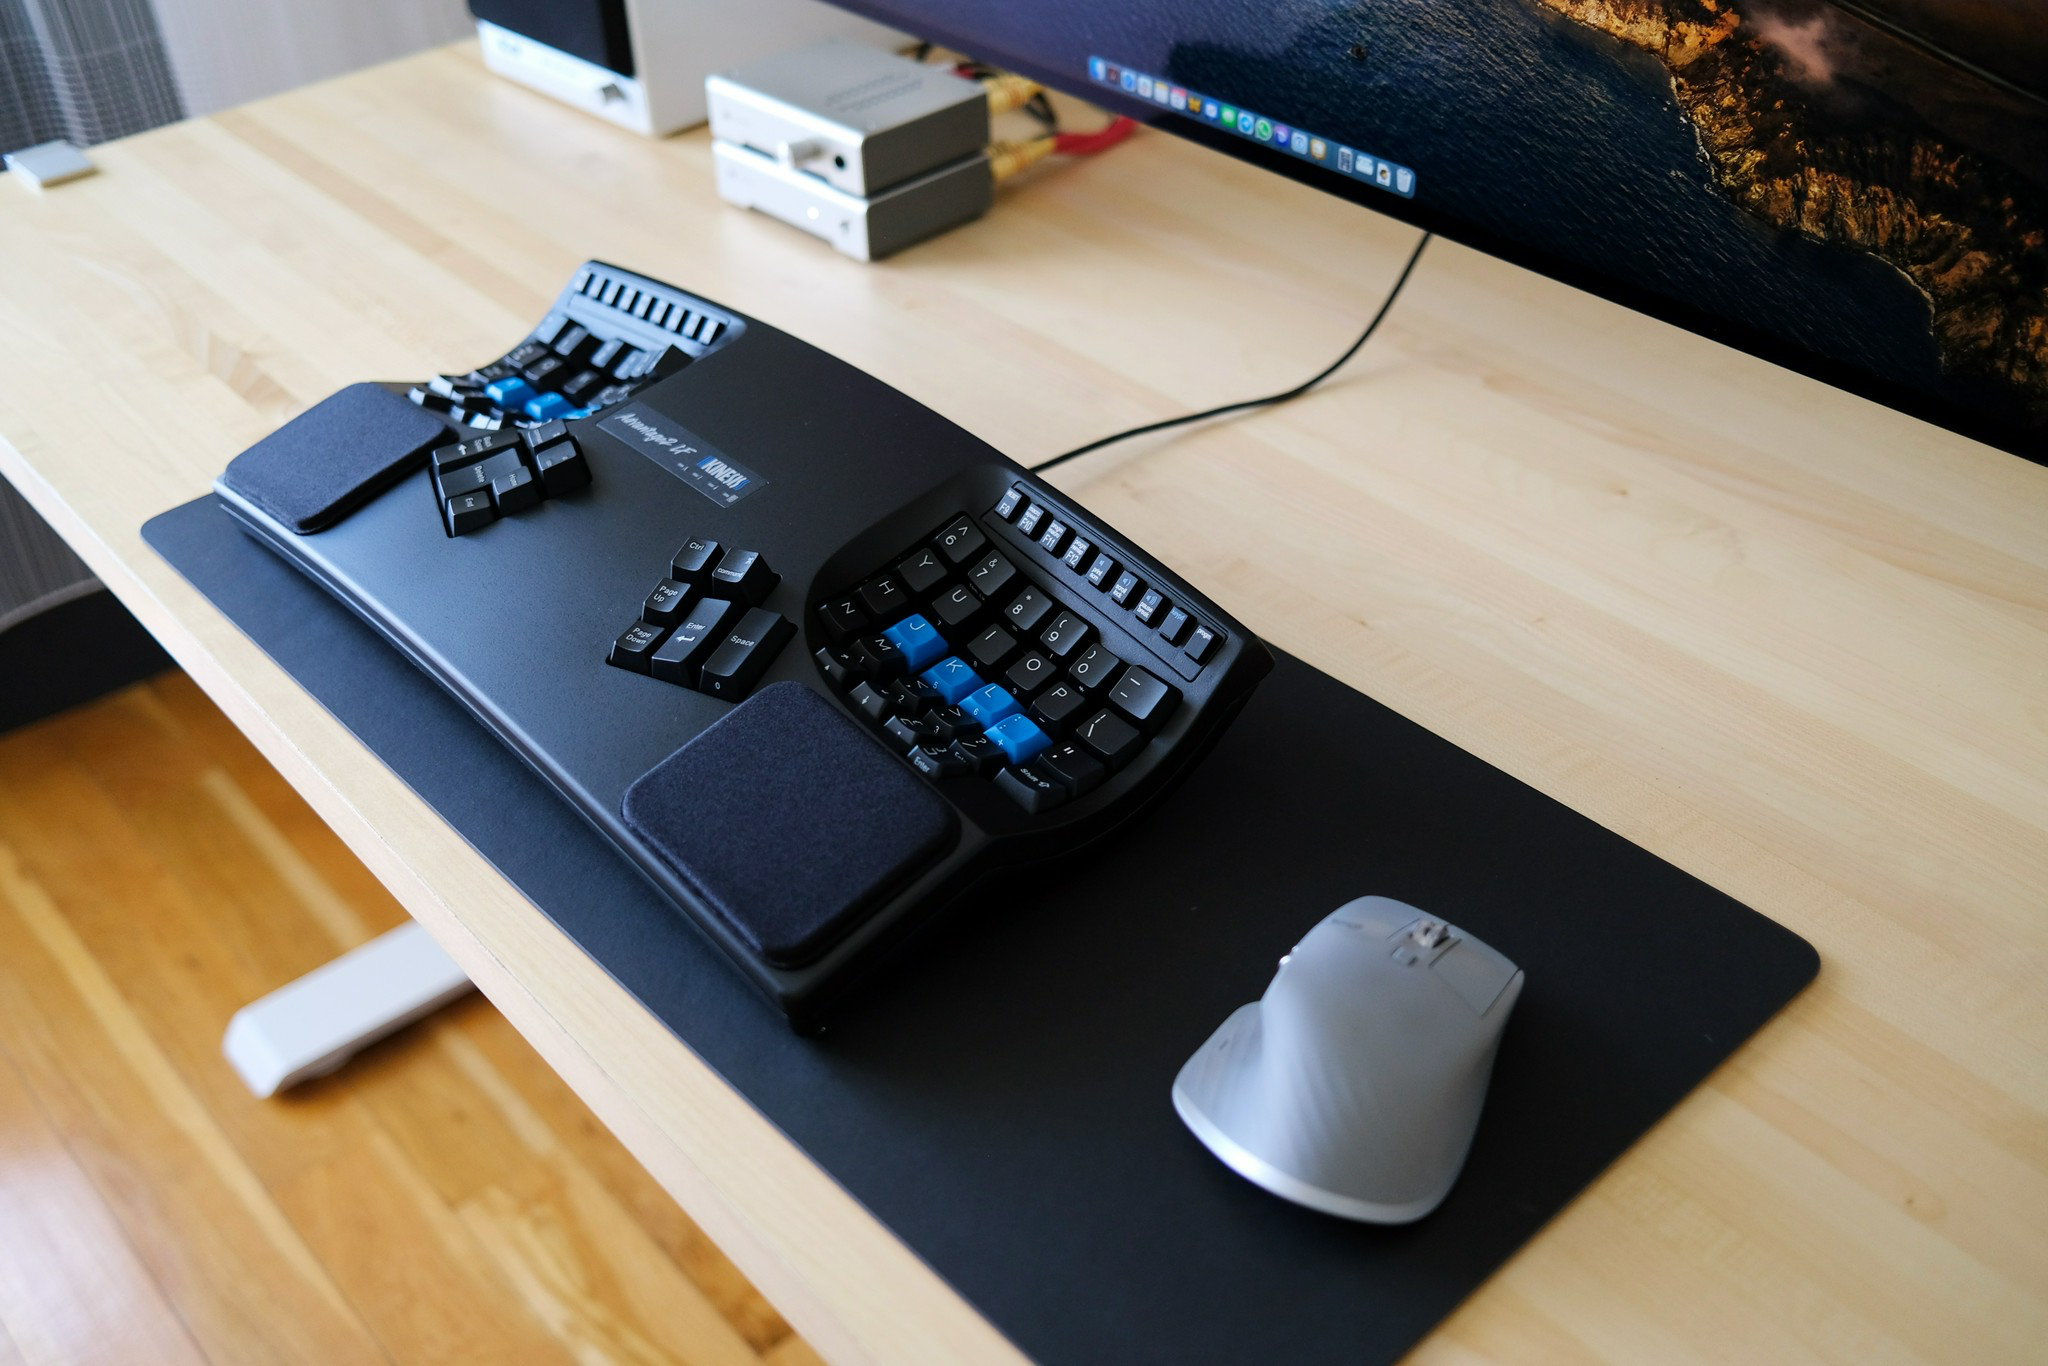
The second step I took was to order a Kinesis Advantage2. That's right. The Kinesis Advantage2 keyboards are fundamentally different from the current split keyboards. It's still a split keyboard, but the keys are placed into a concave well of a housing. The Advantage2 is one of the few keyboards where your whole hand rests in its natural form.
There wasn't a way to test the Kinesis Advantage2, and hence there might still be issues for my small hands, just like the Moonlander. But I've read a lot of reviews and comments. This YouTube video that compares the Ergodox and Kinesis Advantage2 makes some excellent points. After watching it, I wanted to give the Kinesis Advantage2 a try.
Before I made my mind and ordered the Moonlander, I wanted to give Kinesis a try in my initial research. But as I said earlier, split keyboards were an entirely new thing for me. And I wasn't confident if I could be able to adapt to this kind of keyboards. Now that this is not an issue for me anymore, It's time to try it out.
I also know that the controller and firmware on the Kinesis Advantage2 are proprietary. But there are mods to change the built-in controller with a new board that supports QMK. If I'll like the Kinesis and find the current firmware limiting, I plan to the modifications.
Verdict
If you've read until here, thank you! I know it's a long read, but I wanted to make sure to cover all the things that have bothered me (in a good or bad way).
Suppose you're a person that even the slightest pain, don't wait. I know it's not easy to make the change, but if you're a professional working in this area, you have to take care of yourself. It's going to pay off immediately, and you're going to enjoy your life. Once you get up to speed, you're going to ask yourself why you didn't make the change earlier.
For me, it's one of the best decisions I made in my professional career. I wish I did it earlier, but better soon than later. I'm planning to write a couple of more blog posts, one for building your split keyboard from scratch (Kyria) and one about my experiences with the Kinesis Advantage2. Stay tuned!