Alacritty integration with Tmux

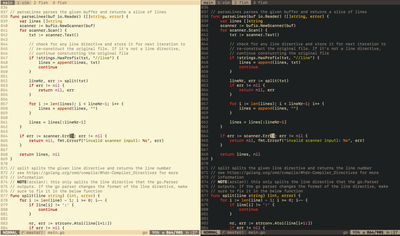
I'm a huge Vim fan and using it since 2002 (the year I've started to learn Linux and how to compile Gentoo kernel). It's a fundamental part of my life. But lately, I'm very sad about the performance on macOS terminals (iTerm2 and Terminal.app). On Linux, vim is literally flying, but on macOS, Vim rendering is very slow and lagging.
This wasn't always the case though. Some of the older version of iTerm2's rendering was fast. I know it was fast. But with each macOS update and iTerm2 update, it would either get fast or slow. Some versions work decent, some don't. And I didn't want to stuck with an older version as well, as the newer version of iTerm2 always has a lot of bug fixes.
After upgrading to a new machine (iMac Pro), I thought it would be much faster now that I have a beast under me. But nope :) Things don't work like that. This was really frustrating. Upon some research, I've found my answer.
GPU accelerated terminal
I'm not alone. There are also other people who are not happy with current state of emulators. Joe Wilm decided to change it and started the project "Alacritty".
Alacritty, is a cross-platform, GPU accelerated terminal emulator written in Rust. It is focused on simplicity and performance and therefore it's very opinionated, but at the same time also very ambitious. Time will tell how Alacritty will end up, but I see already that it has a lot of fans. What makes Alacritty so different from others?
Obviously, GPU accelerated rendering is the biggest selling point (using OpenGL). However, it's very opinionated as well:
- It aims to be the fastest terminal emulator available everywhere. This is
done mainly by using custom written, fast parsers in Rust with advanced
techniques (such as table-driven parsing and using zero-cost abstractions in
Rust) - Simplicity is one of the core values of Alacritty. This means there is no GUI
to change the configuration, no pane/window handling (no tabs or
vertical/horizontal splits), no scrollback, etc.. The list goes on. Instead,
one has to use something like Tmux to include all these features. This
surprisingly works really good. However, there is an open PR that implements
scrollback, so things can change regarding the focus towards simplicity. - Appearance is another important part of Alacritty. One difference I could see is that with my new iMac Pro, the display supports the P3 color gamut. iTerm2 uses sRGB, whereas Alacritty uses the system color profile. The colors are much more vibrant in Alacritty.
- Alacritty is cross-platform. It aims a support for Linux, macOS, and Windows.
The author wrote a blog post that goes over these in more detail. Worth reading
it: Announcing Alacritty
Install Alacritty
There are no binaries to install, from the author's words:
Precompiled binaries will eventually be made available on supported
platforms. This is minimally blocked in a stable config format. For now,
Alacritty must be built from source.
So how do you build from the source? This is all written in the README.md
file. I didn't find the README.md very useful as the steps for macOS is all
over the place. Here is a recap for you:
First, you need Rust to compile and build Alacritty. The easiest way to install rust is to to use the official toolchain installer rustup.rs. Execute the following line to install rust:
curl https://sh.rustup.rs -sSf | sh
(note: Kudos to the Rust team to great an easy to install experience for rust
toolchain, but I have to say that Go's native macOS dmg installer feels more
secure)
All rust related binaries will be installed to .cargo/bin. Make sure to add it to your PATH:
export PATH="$HOME/.cargo/bin:$PATH"
Finally, make sure you have the right Rust compiler installed:
rustup override set stable
rustup update stable
And then git clone Alacritty and start compiling the macOS app:
git clone https://github.com/jwilm/alacritty.git
cd alacritty
make app
Once this is finished, you'll get a ready to use Alacritty.app file. Copy it
to /Applications and you're done!:
cp -r target/release/osx/Alacritty.app /Applications/
But, don't start Alacritty yet. There are couples of configuration steps worth talking. Let's do them.
Configure Alacritty
There is a ready to use configuration file in Alacritty for macOS. Copy it to the configuration folder of Alacritty (be sure to be inside the git repo):
mkdir -p ~/.config/alacritty
cp alacritty_macos.yml ~/.config/alacritty/alacritty.yml
Now when you start Alacritty, it should start with this base configuration.
We're not finished yet as I've customized it a little bit for my need. What are
these?
First I'm using the SF Mono fonts:
font:
  normal:
    family: SF Mono
    style: Regular

  bold:
    family: SF Mono
    style: Bold

  italic:
    family: SF Mono
    style: Italic
I don't like pure black background because it hurt my eyes. I, therefore, use a
slightly less muted background. I also like a red cursor block:
custom_cursor_colors: true

colors:
  primary:
    background: '0x191919'
    foreground: '0xeaeaea'

  cursor:
    text:   '0xf1c1c1'
    cursor: '0xff2600'
I don't want to see my cursor when I use the terminal, so I disable showing the
cursor it with:
hide_cursor_when_typing: true
My shell is set to zsh. We have to tell Alacritty explicitly which shell we
use:
shell:
  program: /usr/local/bin/zsh
  args:
    - --login
Lastly, I don't use cmd+w to close a window (we're going to use it for
something else). Therefore I deleted the following line from key_bindings:
key_bindings:
  # remove the line below!
  - { key: W, mods: Command, action: Quit }
Those are the main parts in my configuration. I'm still discovering new things
and updating my alacritty.yml file from time to time. Be sure to follow my
dotfiles repo to see the latest changes:
https://github.com/fatih/dotfiles/blob/master/alacritty.yml
We're still not finished though. The key_bindings field is interesting that it allows us to capture any shortcut and execute certain commands. We can even write escape sequences for certain shortcuts. This is very powerful because it allows us to customize Alacritty even further if used with tmux.
Make Alacritty feel like iTerm2
I like iTerm2 and using heavily the split/vertical panes, tabs, resizing the panes etc.. features of it. It's heavily customized for my needs. As I said, Alacritty doesn't support any of the bells and whistles. But it can be configured to send escape sequences (in hex code) for your custom shortcuts.
Before we dive into this, note that I use tmux for managing my views. tmux is very powerful, so you can do a lot of things with it. You can see my tmux configuration file in my dotfiles repo: tmux.conf
All terminal multiplexers/applications have their own terminology. In tmux this is:
- session: a collection of terminals that
tmuxhandles. Each session has one more window - windows: a window occupies the entire screen. It can be split into rectangular panes
- panes: the smallest unit in a window. One or multiple panes
This is kinda the same in iTerm2, except windows is called tabs. I'm using tabs and panes heavily in iTerm2 with shortcuts (no mouse is used), such as :
- create/close a new tab
- create vertical and horizontal pane
- increase/decrease size of panes
- jump between tabs directly
- move between panes easily
I can do all these actions with tmux as well. But not with the same shortcuts. For example, if I want to open a new vertical pane, I have to type the following:
ctrl-f v
This means, you first press ctrl and f together, and then press v. For horizontal split, I use the following:
ctrl-f s
Same, for the steps above I have to use these shortcuts in tmux (I've manually changed some of them to my own liking):
- create a tab:
ctrl-f c - close a tab:
ctrl-f & - close a pane:
ctrl-f x(this also closes the tab if there is a single pane) - create vertical pane:
ctrl-f v - create horizontal pane:
ctrl-f s - move between panes:
ctrl-f h,ctrl-f j,ctrl-f kandctrl-f l - resize panes:
ctrl-f H,ctrl-f J,ctrl-f Kandctrl-f L - jump to specific tab:
ctrl-f <number>, i.e:ctrl-f 3
However, I use a completely different shortcut set under iTerm2:
- create a tab:
cmd + t - close a tab:
cmd + w - close a pane:
cmd + w - create vertical pane:
cmd + d - create horizontal pane:
cmd + shift + d - move between panes:
cmd + h,cmd + j,cmd + kandcmd + l - resize panes:
cmd + left,cmd + right,cmd + upandcmd + down - jump to specific tab:
cmd + <number>, i.e:cmd + 3
Now the question boils down how to use these shortcuts in tmux? As I said,
Alacritty can be configured to send escape sequences (in hexcode) for your
custom shortcuts.
So, for example, you can send a hex code that represents the key combination ctrl-f v which in my case opens a vertical pane. The hex code for this combination is: 0x06 0x76. There are many ways to find out how to obtain these hex codes. One of them is the tool xxd. xxd is a tool that creates a hex dump of a given file or standard input. This is very useful because escape sequences we set in Alacritty needs to be presented in hex codes.
From your terminal, if you run xxd -psd and press ctrl-f v and then enter and finally ctrl-c to exit, it outputs the following:
$ xxd -psd
^Fv
06760a^C
What matters is the sequence 06760a^C. Let's split it every two characters:
06 -> ctrl-f
76 -> v
0a -> return
^C -> ctrl-c
From here, we know that 0x06 0x76 corresponds to ctrl-f v. This is the most important part. Once we have this, we can now tell Alacritty to use this escape sequence code. Remember that I use cmd + d to open a vertical pane, now we're going to tell Alacritty to invoke the above escape sequence whenever we usecmd + d inside Alacritty:
To do this, we need to add a line to key_bindings field in alacritty.yml:
- { key: D, mods: Command, chars: "\x06\x76" }
That's it! Now whenever you press cmd + d inside Alacritty, this will automatically be transformed into the escape sequence \x06\x76 which then opens a vertical tab in tmux.
Once you have this done, we need to add all other shortcuts as well. This is the only time-consuming part because you have to call xxd for each tmux shortcut to obtain the hex code. Let me know if you know if there is an easier way to do it (maybe an ASCII table?)
The followings are the ones that I'm using:
key_bindings:
	- { key: D,     mods: Command,       chars: "\x06\x76" }
	- { key: D,     mods: Command|Shift, chars: "\x06\x73" }
	- { key: W,     mods: Command,       chars: "\x06\x78" }
	- { key: H,     mods: Command,       chars: "\x06\x68" }
	- { key: J,     mods: Command,       chars: "\x06\x6a" }
	- { key: K,     mods: Command,       chars: "\x06\x6b" }
	- { key: L,     mods: Command,       chars: "\x06\x6c" }
	- { key: T,     mods: Command,       chars: "\x06\x63" }
	- { key: Key1,  mods: Command,       chars: "\x06\x31" }
	- { key: Key2,  mods: Command,       chars: "\x06\x32" }
	- { key: Key3,  mods: Command,       chars: "\x06\x33" }
	- { key: Key4,  mods: Command,       chars: "\x06\x34" }
	- { key: Key5,  mods: Command,       chars: "\x06\x35" }
	- { key: Key6,  mods: Command,       chars: "\x06\x36" }
	- { key: Key7,  mods: Command,       chars: "\x06\x37" }
	- { key: Key8,  mods: Command,       chars: "\x06\x38" }
	- { key: Key9,  mods: Command,       chars: "\x06\x39" }
	- { key: Left,  mods: Command,       chars: "\x06\x48" }
	- { key: Down,  mods: Command,       chars: "\x06\x4a" }
	- { key: Up,    mods: Command,       chars: "\x06\x4b" }
	- { key: Right, mods: Command,       chars: "\x06\x4c" }
Finally here is my full configuration I use for Alacritty in my dotfiles repo if you're interested: alacritty.yml
Final words
I'm using now Alacritty for a while and I really like it. I still need to get used to the combination of using tmux with Alacritty. There are couples of random things that I have to mention though:
- Copy/paste is still a hassle for me. Selecting with mouse is possible, but I have to press
ybefore I release my selection with mouse. This is really awkward. Because of that, I'm using more and more thevim-copymode in tmux. This allows me to copy the text without using the mouse. It's not the best for me right now, but let's see if this is something I can live with. - If you resize Alacritty (say with mouse), the content disappears until the resizing is finished. This is a known bug (https://github.com/jwilm/alacritty/issues/869) and the fix is to disable transparency if you use
High Sierra. There is no setting in the configuration, so I've recompiled Alacritty by disabling transparency insrc/windows.rs:
let window = WindowBuilder::new()
    .with_transparency(false)
- There is another weird bug that only happens when I focus on Alacritty by clicking with the mouse. In this case, the statusline of Vim suddenly jumps
to the middle of the screen. When this happens there is no way I can fix it
from the keyboard. I'll update the blog post when I find a solution for this. - Alacritty is a fairly new project compared to other terminal applications. It
has a lot of edge cases, so don't seek short-term stability for now - I can click on any URL with mouse in iTerm2 (with alt key) and it would open it in a browser. This is not possible with tmux+alacritty. However, there is a plugin in tmux that enables this with keyboard shortcut: https://github.com/tmux-plugins/tmux-open
- The author of iTerm2 started to implement GPU-based renderer as well and it's merged to master. This means you can download the nightly iTerm2 and have the same speed benefits. Here is how you can do it:
https://gitlab.com/gnachman/iterm2/wikis/Metal-Renderer#how-to-test-it - Alacritty looks beautiful on my iMac Pro's display because it uses the System
(P3) color profile. iTerm2 doesn't do this, therefore the colors look dull and are not vibrant as Alacritty. There is an open issue and the author of iTerm2 aims to fix it.
I'm going to use Alacritty for a foreseeable future, however, I'm not closing the doors to iTerm2 either. With time I'll see if I can live with Alacritty or not.
Finally, I want to thank Cihangir Savaş and for his much valuable feedback and suggestions.